| Product Includes | Volume | Reactivity | Isotype | ||
|---|---|---|---|---|---|
| CD31 (PECAM-1) (89C2) Mouse mAb (SignalStar™ Conjugate 0028) | 50 µl | H | Mouse IgG1 | ||
| Complementary Oligo (CO-0028-750) | 22 µl |
Product Information
| Application | Dilution |
|---|---|
| SignalStar™ Leica Bond | 1:50 - 1:200 |
| SignalStar™ Manual | 1:50 - 1:200 |
 |
Storage: Store all kit components at -20°C. Stability: All components in this kit are stable for at least 12 months when stored at the recommended temperature. Do not exceed 5 freeze/thaw cycles. Application: The SignalStar kits are intended for fluorescent multiplex immunohistochemistry. Slide Number: This kit contains sufficient materials for the staining of 10 slides. |
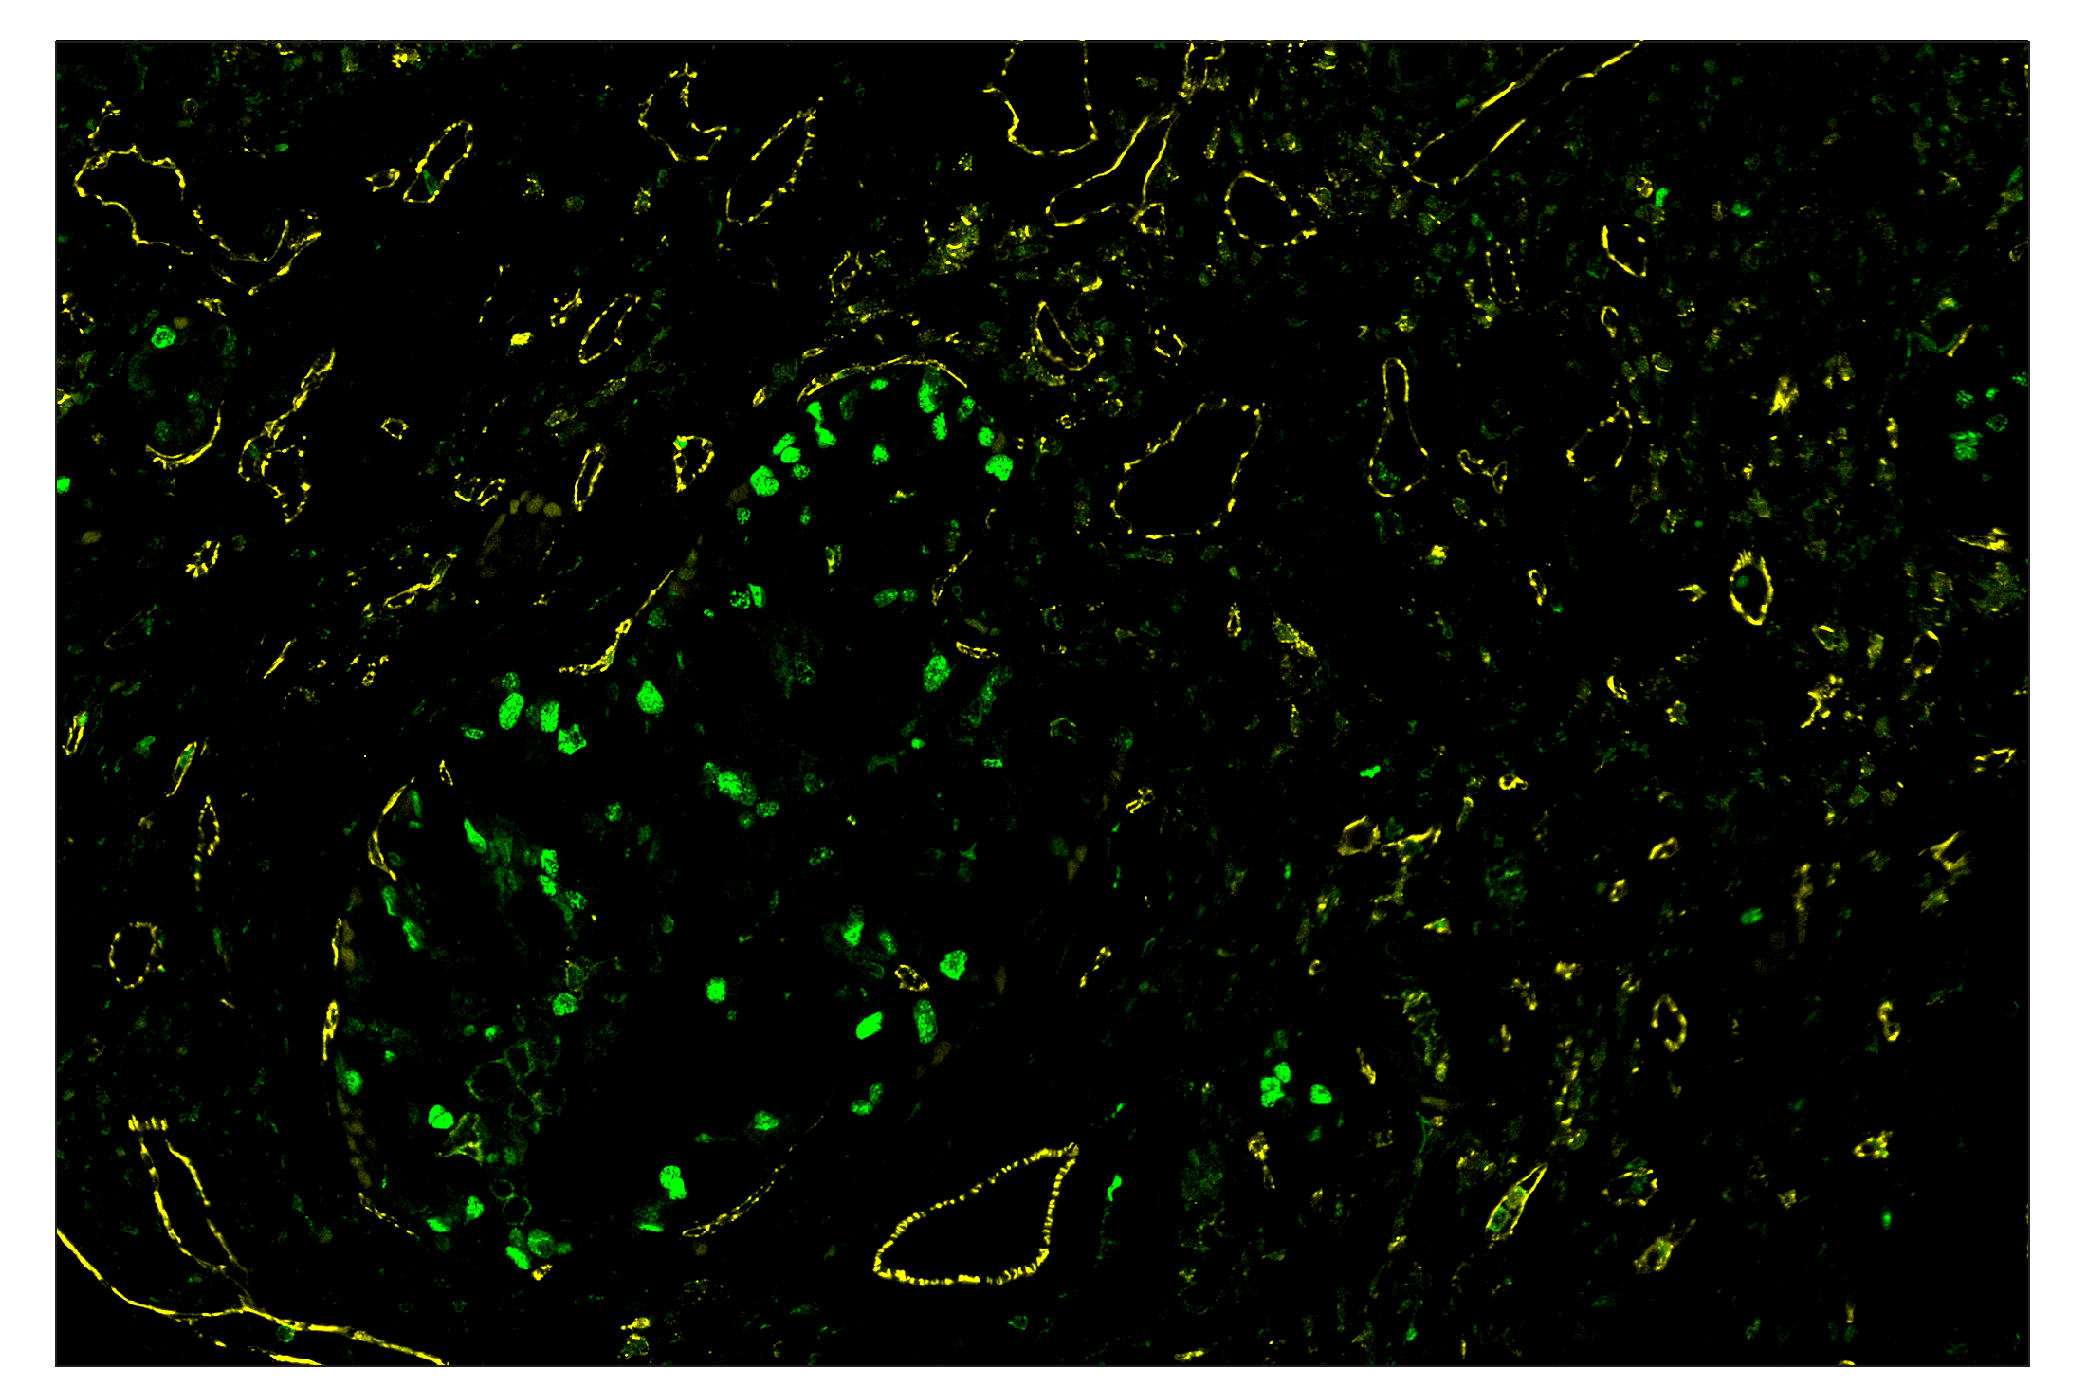
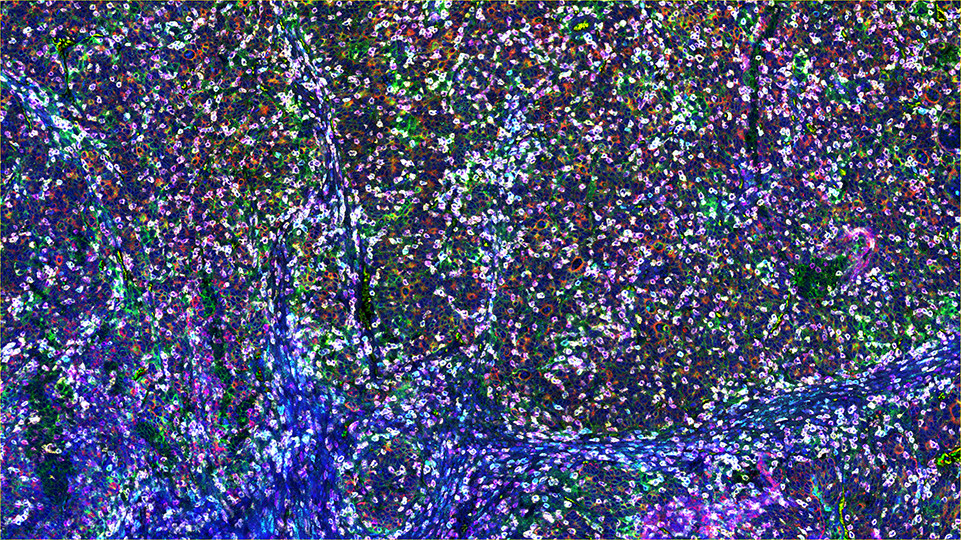
SignalStar multiplex immunohistochemistry (mIHC) is a tool that employs antibodies, oligonucleotides (oligos), and fluorophores to interrogate the cellular presence, location, function, and biomarker co-expression patterns. SignalStar technology enables the detection of multiple phenotypic and functional targets while maintaining spatial context and tissue architecture. These insights are essential for understanding how cells organize and interact to influence the tissue microenvironment and drive disease progression and response to therapy.
The power of the SignalStar system lies in the design of the SignalStar antibodies. These antibodies have been rigorously validated for use in formalin-fixed, paraffin-embedded (FFPE) tissues, and subsequently conjugated to unique oligo tags using site-specific conjugation and thorough purification methodologies. Using a highly specific network of complementary oligos and fluorophores, scientists can amplify the signal for 3-8 targets, even if they are in low abundance.
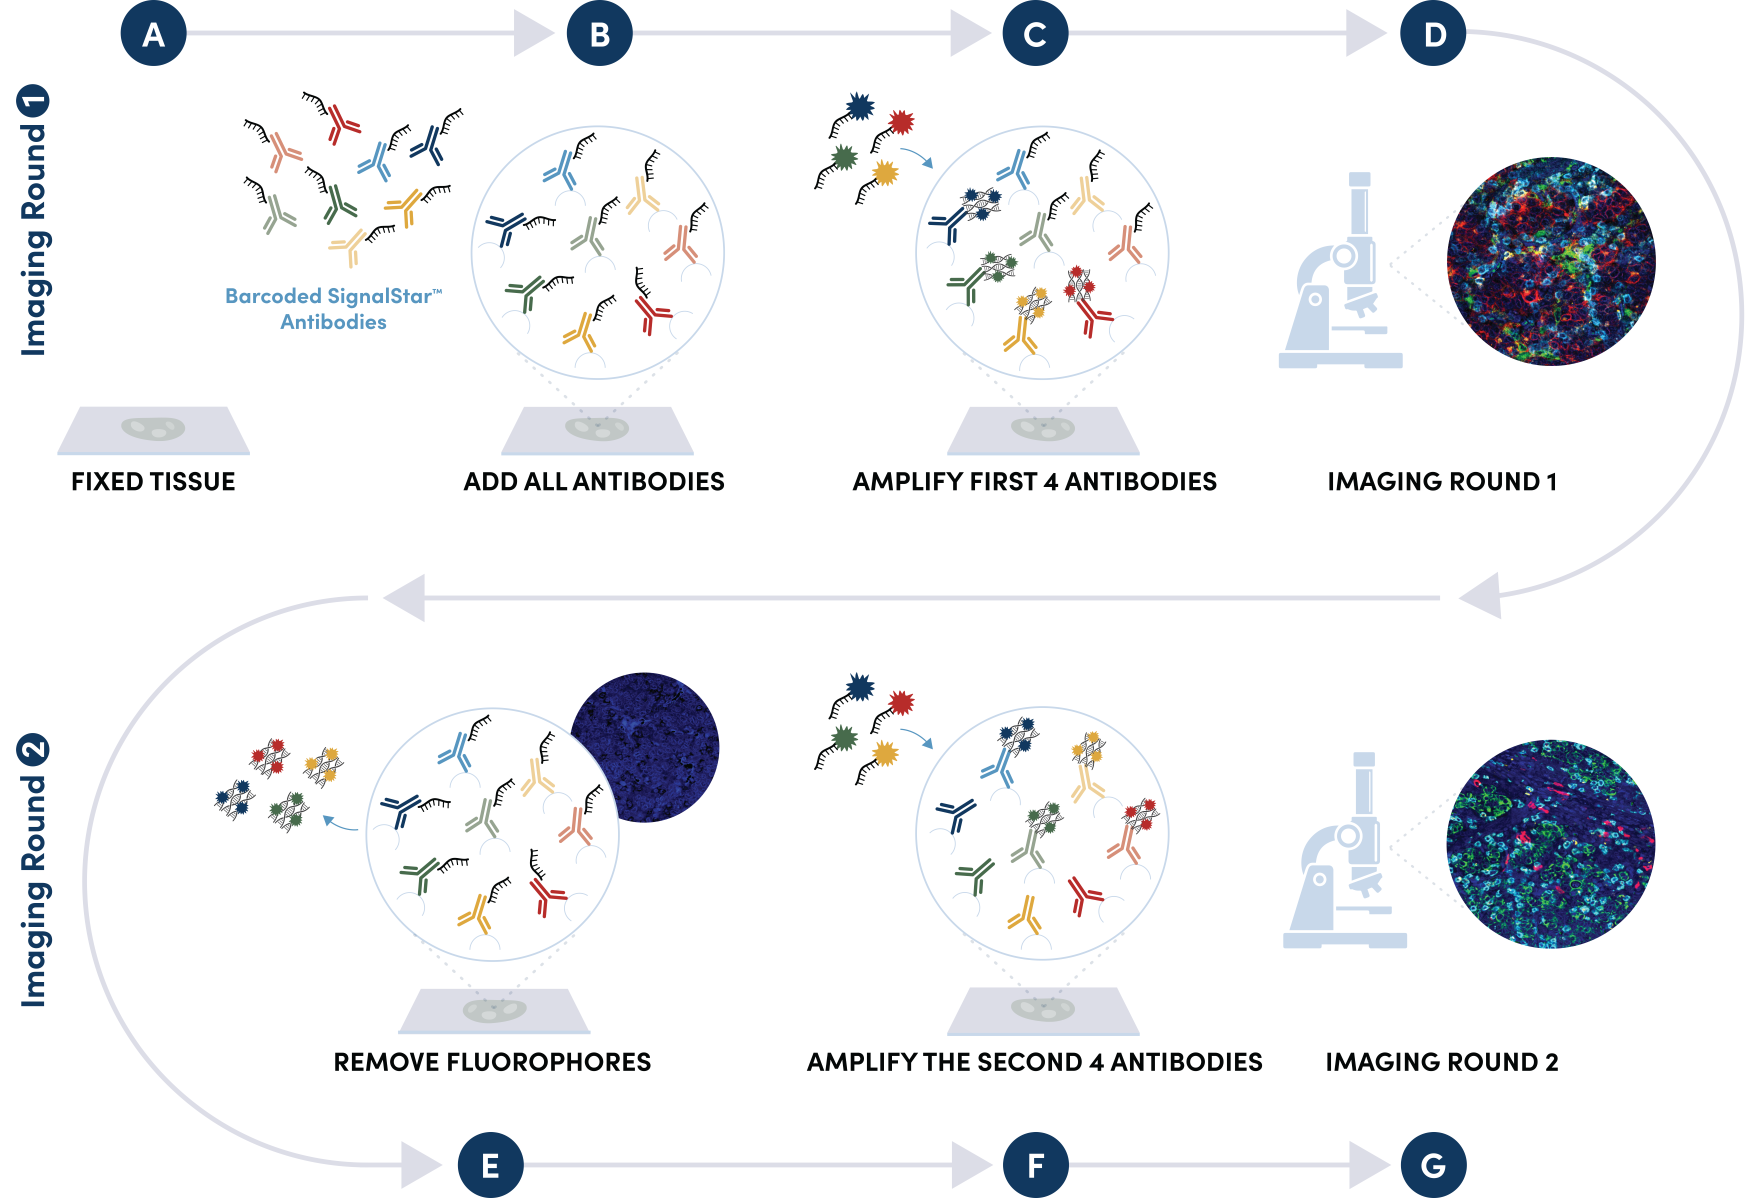
Figure 1. All antibodies in your plex size of choice (3-8 maximum unique oligo-conjugated antibodies) are added in cocktail in one primary incubation step. Complementary oligos with fluorescent dyes (channels: 488, 594, 647, and 750) amplify the signal of up to 4 oligo-conjugated antibodies in the first round of imaging by building oligo-fluorophore constructs attached to the antibody. If the plex size is greater than 4, the first round of oligos and fluorophores are gently removed, and a second round of amplification is performed to visualize up to 4 additional oligo-conjugated antibodies; the complementary oligo system and the use of the fluorophore removal process enables a second round of antibodies to be amplified from the same substrate, without cross-reactivity. The 2 images are then aligned and fused computationally with either proprietary or open-source software to generate an image consisting of up to 8 targets.
| Materials Included in Kit |
| Up to 8 SignalStar oligo-conjugated antibodies (see below) |
| Up to 8 SignalStar complementary oligos (see below) |
| SignalStar™ Antibody Diluent A |
| SignalStar™ Antibody Diluent B |
| SignalStar™ Amplification Buffer A |
| SignalStar™ Amplification Buffer B |
| SignalStar™ Amplification Oligo Set A: |
| 488 |
| 594 |
| 647 |
| 750 |
| SignalStar™ Amplification Oligo Set B: |
| 488 |
| 594 |
| 647 |
| 750 |
| SignalStar™ Ligation Buffer |
| T4 DNA Ligase (5 U/µL) |
| ATP (100 mM) |
| 10X dsDNase Buffer |
| dsDNase |
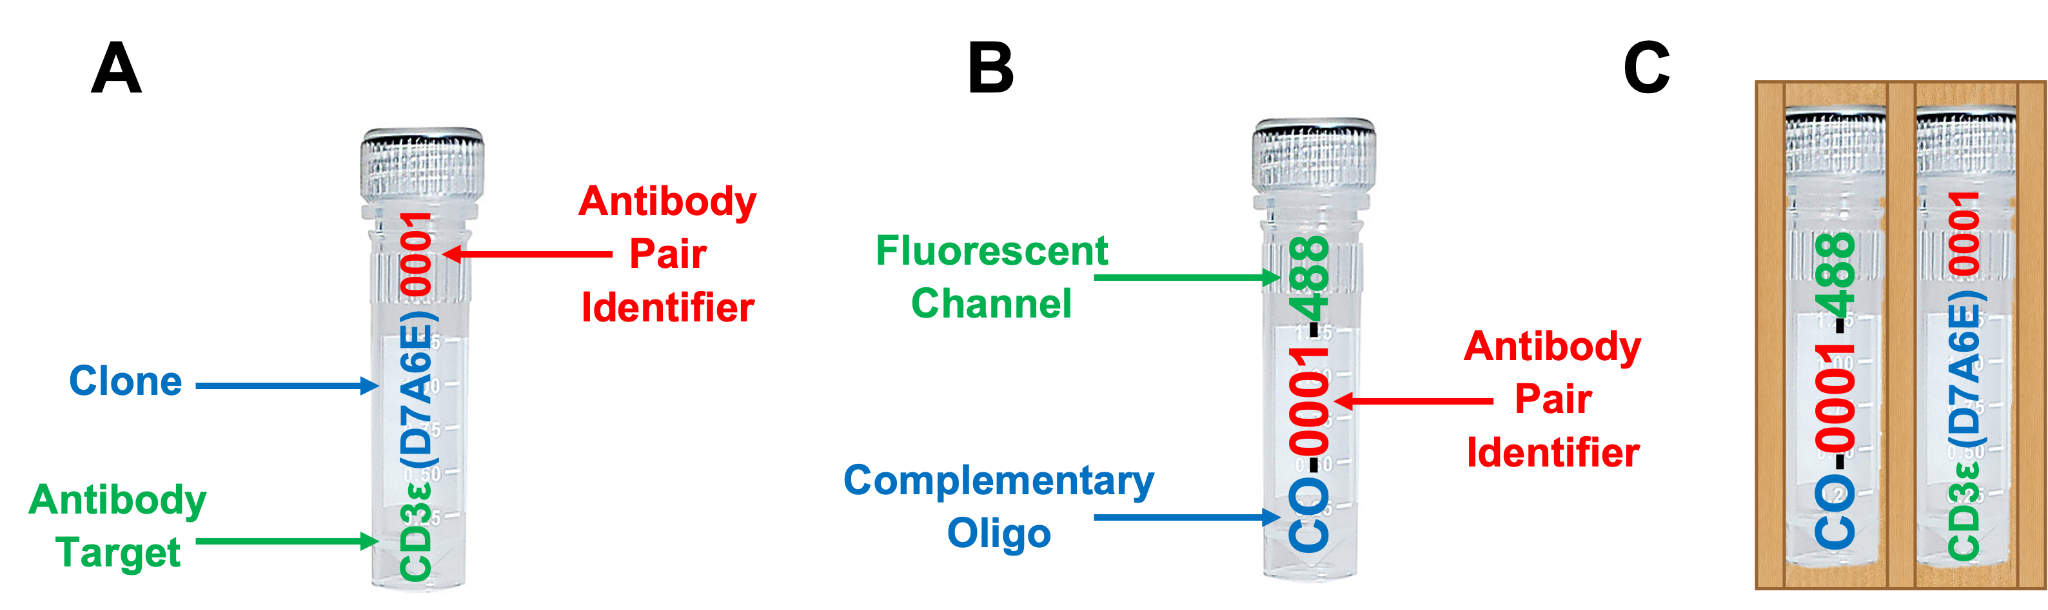
Included are up to 8 SignalStar oligo-conjugated antibodies (A) and up to 8 SignalStar complementary oligos (B) selected at the time of order and provided in sleeves with their respective oligo-antibody pair (C). See example below.
 |
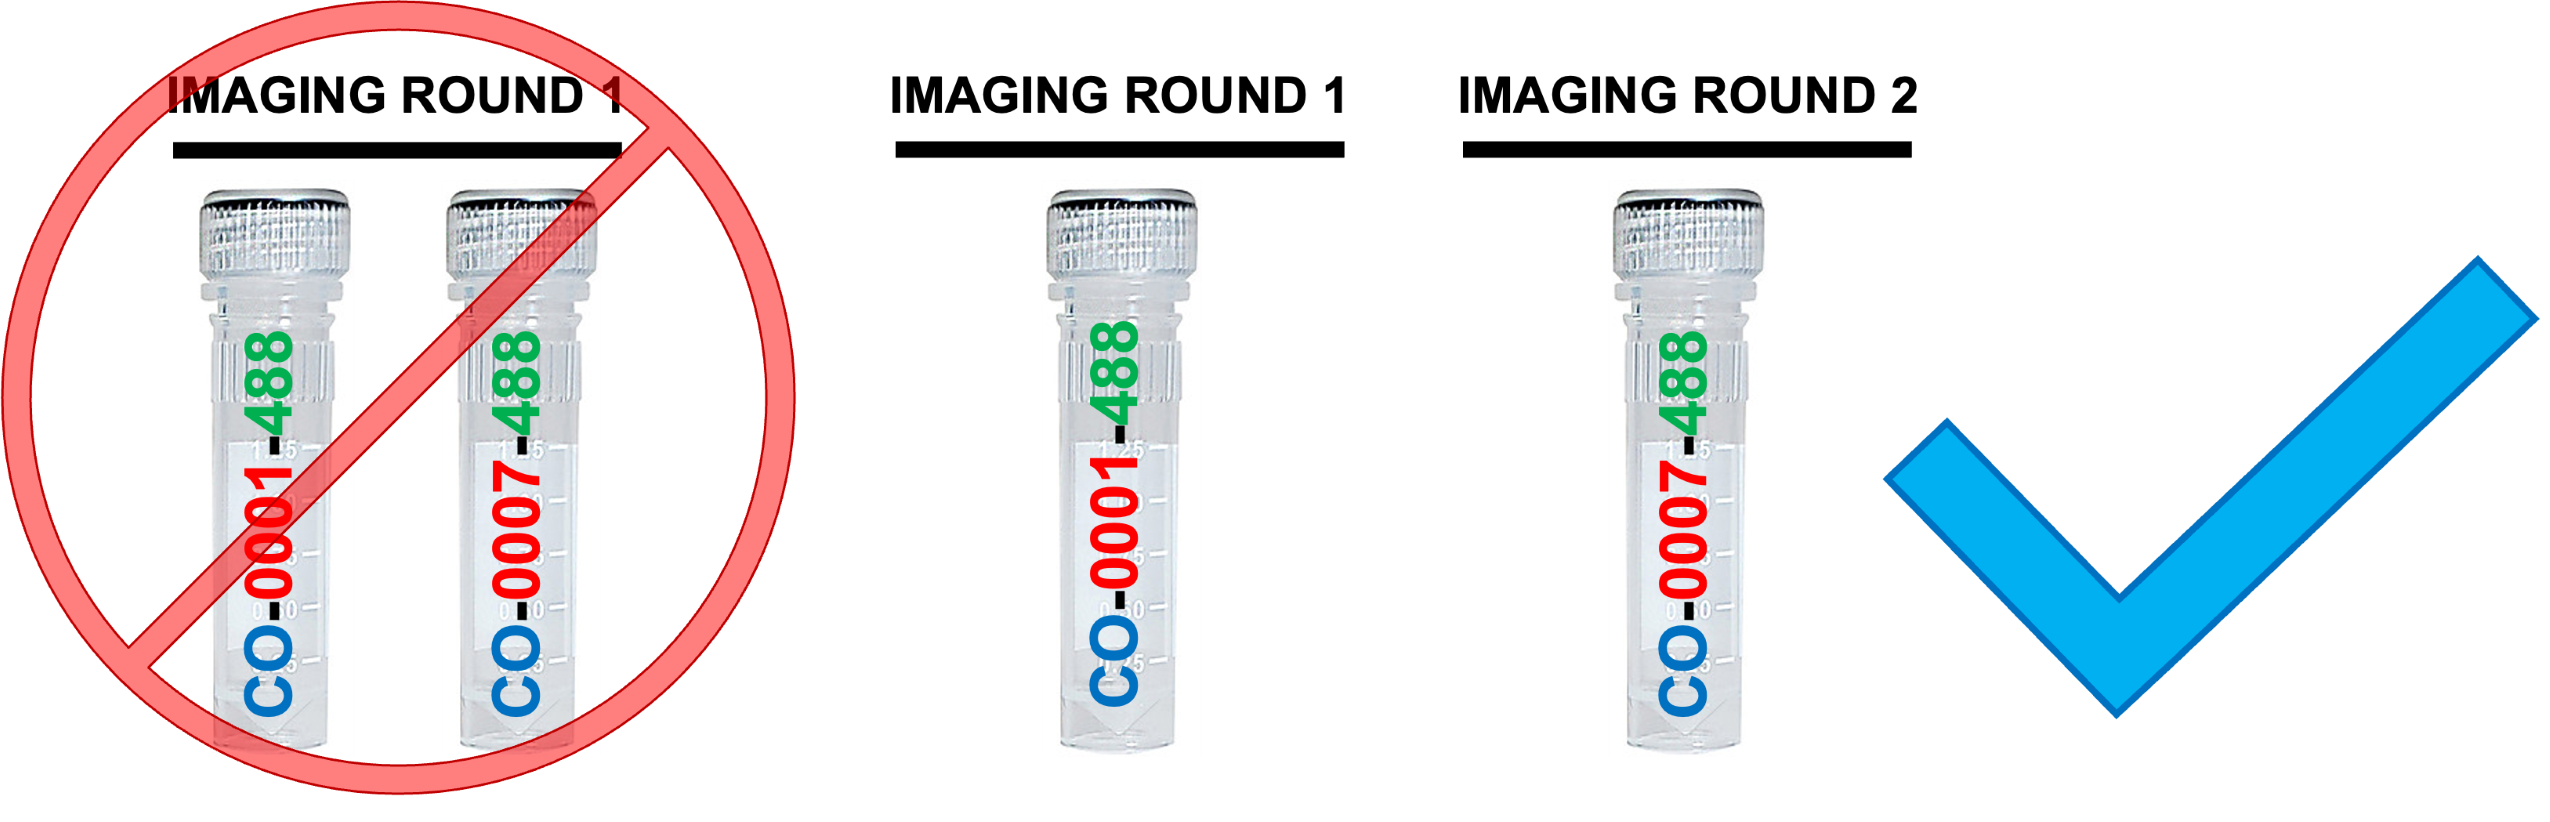
DO NOT COMBINE COMPLEMENTARY OLIGOS OF THE SAME FLUORESCENT CHANNEL. Imaging rounds can contain only 1 complementary oligo for each fluorescent channel. DO NOT COMBINE COMPLEMENTARY OLIGOS SPECIFIC TO THE SAME FLUORESCENT CHANNEL IN THE SAME IMAGING ROUND, AS IT WILL RENDER THE ASSAY RESULTS UNINTERPRETABLE. |
|||||||||||||||||||||||||
 |
||||||||||||||||||||||||||
|
DO NOT COMBINE ANTIBODIES FROM DIFFERENT PANELS. If you are running multiple panels simultaneously, a separate antibody/complementary oligo mix must be generated for each unique panel. |
|||||||||||||||||||||||||
 |
Use the BOND RX software to set up protocols and reagents PRIOR to creating your solutions. Create containers, protocols, and a new BOND Research Detection System. A BOND Research Detection System is required to run this protocol. |
|||||||||||||||||||||||||
|
After performing each round of the SignalStar assay, always run an aspirating probe cleaning on the BOND RX. |
|||||||||||||||||||||||||
|
Please confirm whether your SignalStar panel design requires 2 rounds of imaging. Utilize the Example SignalStar Panel Design and SignalStar Panel Design Worksheet in section 10.1 and 9.1 of this document for guidance and assistance. |
|||||||||||||||||||||||||
|
Confirm your microscope can detect the fluorophores provided in this kit. When imaging, there are 4 fluorescent channels in addition to DAPI that need to be acquired. |
|||||||||||||||||||||||||
|
||||||||||||||||||||||||||
 |
It is recommended that a spectral library be created by imaging single stained slides for the spectra described above. This will enable better unmixing to help minimize the possibility of spectral bleed-through. |
|||||||||||||||||||||||||
|
Usage of a DAPI concentrate is recommended rather than a mount that contains DAPI. Bright DAPI staining facilitates better image alignment. |
|||||||||||||||||||||||||
|
Fluorescent signal may be variable or diminished if solutions are not sufficiently mixed. Prior to usage, spin down each reagent at 1,000 rpm for 30 sec, then slowly mix by pipetting. When using reagents, pipette slowly to ensure accuracy. Store all SignalStar kit components on ice when not in use. SignalStar solutions should be used promptly once all reagents have been combined for the run. |
|||||||||||||||||||||||||
|
Optimally, slides should be imaged within 8 hr of staining completion. Fluorescent signal may be diminished if slides are not imaged within this timeframe. |
|||||||||||||||||||||||||
|
Results are not guaranteed if there is any deviation from this protocol. The SignalStar protocol was developed and optimized with the designated antigen retrieval and staining steps. |
|||||||||||||||||||||||||
|
The usage of a positive control slide is recommended. A tissue upon which chromogenic staining has confirmed the presence of all targets in the multiplex panel should be included in each run. |
|||||||||||||||||||||||||
|
It is recommended that each antibody be used at 1:100. However, enough antibody reagent is supplied for usage at either 1:50 or 1:200 dilutions. |
|
Use the BOND RX software to set up protocols and reagents PRIOR to creating your solutions. Requires BOND RX software version 7.0 or greater. |
The following reagents must be created on the BOND RX software for the SignalStar assay:
BOND Titration Container
|
1. MARKER (= SignalStar Staining Solution) |
|
|
2. SignalStar Amplification Solution 1 |
|
|
3. SignalStar Amplification Solution 2 |
|
|
4. SignalStar Ligation Solution |
|
|
5. SignalStar Fluorescent Removal Solution |
BOND 7 mL Open Container
|
6. 10% Neutral Buffered Formalin |
|
|
Select “Hazardous” when creating 10% Neutral Buffered Formalin reagent to ensure the waste is disposed of properly. |
BOND 30 mL Open Container
|
7. 0.1X TBST |
|
|
8. 1X TBST (Required for linking to BOND Research Detection System) |
|
1. Create a new BOND Research Detection System named "CST SignalStar." |
|
|
2. Link 30 mL open container with 1X TBST to the CST SignalStar BOND Research Detection System. |
|
|
The open container in Step 2 must be named distinctly (e.g., ‘1X TBST' instead of '0.1X TBST'). |
|
1. In the BOND RX software, select the "Protocol Setup" tab. |
||||
|
2. Select "*IF Protocol" (ensure that Leica is listed in the "Modified by" column). |
||||
|
3. Copy protocol and rename it "CST SignalStar Imaging Round 1." Add the abbreviated name "CST Rd1." |
||||
|
4. Select "Show wash steps." |
||||
|
|
|||
|
6. Select "CST SignalStar" as preferred Detection System. |
||||
|
7. Select "Create Protocol." |
||||
|
8. Click Save and click Yes to acknowledge the caution message. |
||||
|
9. Create a copy of "CST SignalStar Imaging Round 1" protocol. |
||||
|
10. Change the name of the copy to "CST SignalStar Imaging Round 2" with the abbreviated name "CST Rd2." |
||||
|
11. Select "Show wash steps." |
||||
|
||||
|
13. Select "CST SignalStar" as preferred Detection System. |
||||
|
14. Select "Create Protocol." |
||||
|
15. Click Save and click Yes to acknowledge the caution message. |
|
Each reagent MUST be used in the appropriate BOND RX container or insert from the BOND Titration Kit (#OPT9049) for the assay to run properly. See the table below for the number of containers or inserts necessary to perform the SignalStar assay on the BOND RX autostainer. |
||||||||||||||||||||||||||||||||||
|
DO NOT OVERFILL OPEN CONTAINERS. BOND RX autostainer will consider containers to be "Empty" if they are overfilled. |
||||||||||||||||||||||||||||||||||
|
|||||||||||||||||||||||||||||||||||
|
Once prepared, the SignalStar Imaging Round 1 Solution should contain ALL antibodies (up to 8) ordered with your kit (including those for Imaging Round 1 and Imaging Round 2) and the complementary oligos for Imaging Round 1. Utilize the Example SignalStar Panel Design and SignalStar Panel Design Worksheet in section 10.1 and 9.1 of this document for guidance and assistance. |
||||||||||||||||||||||||||||||||||||||||||||||||||
|
DO NOT COMBINE COMPLEMENTARY OLIGOS OF THE SAME FLUORESCENT CHANNEL. |
||||||||||||||||||||||||||||||||||||||||||||||||||
|
Prepare solutions using low retention pipette tips and rotate end-over-end for 20 min at room temperature. Pipette slowly into BOND 6 mL Titration Insert to ensure accuracy and avoid generating any bubbles. Store all SignalStar kit components on ice when preparing solutions. SignalStar solutions should be used promptly once all reagents have been combined for the run. |
||||||||||||||||||||||||||||||||||||||||||||||||||
|
|||||||||||||||||||||||||||||||||||||||||||||||||||
|
Prepare solutions using low retention pipette tips and rotate end-over-end for 20 min at room temperature. Pipette slowly into BOND 6 mL Titration Insert to ensure accuracy and avoid generating any bubbles. Store all SignalStar kit components on ice when preparing solutions. SignalStar solutions should be used promptly once all reagents have been combined for the run. |
||||||||||||||||||||||||||
|
For a 10 slide run, make up the total volume in a conical tube, rotate for 20 min, then divide evenly among 2 titration inserts. |
||||||||||||||||||||||||||
|
|||||||||||||||||||||||||||
|
Combine the following reagents in one BOND Titration Insert. Cover with parafilm and vortex for 10 sec. Store all SignalStar kit components on ice when preparing solutions. SignalStar solutions should be used promptly once all reagents have been combined for the run. |
||||||||||||||||||||
|
|||||||||||||||||||||
|
|
Slide baking can be performed the day before you begin your experiment. This step allows for the paraffin wax to melt. |
| 1. Incubate slides for 30 min at 60°C. |
| 2. In the BOND RX software, create study and add slides. | |
3. When "adding slides," use the below selections for Tissue Preparation on BOND:
|
|
| 4. Select "SignalStar Imaging Round 1" as the protocol and "HIER ER2 40 min" for each slide. | |
| 5. Print labels, apply to slides, and add slides to the BOND slide tray. | |
| 6. Place BOND covertiles on slides, ensuring that they are properly seated in the tray. | |
|
It is good practice to confirm that each step in the SignalStar Imaging Round 1 protocol is correct. Please use the checklist in section 9.2 to assist in creating your protocol. |
|
Ensure that selected 0.1X TBST washes listed below are set to "Open." Fluorescent signals may be variable or diminished if washes are not "Open." Confirm that there are a total of 6 SignalStar Amplification Solution 1 steps and 6 SignalStar Amplification Solution 2 steps. |
|
Confirm the bulk Bond Wash Solution container is full, and the waste containers are empty. |
| 7. Start BOND RX run. | |
|
Immediately start the BOND RX staining run, do not use a delayed start. Slides can sit overnight on the BOND RX autostainer once staining is complete. |
| 8. Remove slides from the BOND RX autostainer and place into 0.1X TBST. | |
| 9. Run aspirating probe cleaning run on the BOND RX autostainer. Clean covertiles as per routine procedures. | |
| 10. Prepare DAPI #4083 solution according to datasheet instructions. | |
| 11. Counterstain with DAPI solution. | |
| 12. Immerse slides in 0.1X TBST for 30 sec. | |
| 13. Mount slides with ProLong Gold Antifade Reagent #9071. | |
| 14. Image slides within 8 hr. | |
|
Do not let slides dry out at any point once they are deparaffinized or have had coverslips removed. |
|
Each reagent MUST be used in the appropriate BOND RX container or insert from the BOND Titration Kit (#OPT9049) for the assay to run properly. See the table below for the number of containers or inserts necessary to perform the SignalStar assay on the BOND RX autostainer. |
||||||||||||||||||||||||||||||||||||||
|
DO NOT OVERFILL OPEN CONTAINERS. BOND RX autostainer will consider containers to be "Empty" if they are overfilled. |
||||||||||||||||||||||||||||||||||||||
|
|||||||||||||||||||||||||||||||||||||||
|
Once prepared, the SignalStar Imaging Round 2 Solution should contain the complementary oligos for Imaging Round 2. Utilize the Example SignalStar Panel Design and SignalStar Panel Design Worksheet in section 10.1 and 9.1 of this document for guidance and assistance. |
||||||||||||||||||||||||||
|
DO NOT COMBINE COMPLEMENTARY OLIGOS OF THE SAME FLUORESCENT CHANNEL. |
||||||||||||||||||||||||||
|
Prepare solutions using low retention pipette tips and rotate end-over-end for 20 min at room temperature. Pipette slowly into BOND 6 mL Titration Insert to ensure accuracy and avoid generating any bubbles. Store all SignalStar kit components on ice when preparing solutions. SignalStar solutions should be used promptly once all reagents have been combined for the run. |
||||||||||||||||||||||||||
|
|||||||||||||||||||||||||||
|
Prepare solutions using low retention pipette tips and rotate end-over-end for 20 min at room temperature. Pipette slowly into BOND 6 mL Titration Insert to ensure accuracy and avoid generating any bubbles. Store all SignalStar kit components on ice when preparing solutions. SignalStar solutions should be used promptly once all reagents have been combined for the run. |
||||||||||||||||||||||||||
|
For a 10 slide run, make up the total volume in a conical tube, rotate for 20 min, then divide evenly among 2 titration inserts. |
||||||||||||||||||||||||||
|
|||||||||||||||||||||||||||
|
Combine the following reagents in 1 BOND Titration Insert. Cover with parafilm and vortex for 10 sec. Store all SignalStar kit components on ice when preparing solutions. SignalStar solutions should be used promptly once all reagents have been combined for the run. |
||||||||||||||||||||
|
|||||||||||||||||||||
|
Combine the following reagents in 1 BOND Titration Insert. Cover with parafilm and vortex for 10 sec. Store all SignalStar kit components on ice when preparing solutions. SignalStar solutions should be used promptly once all reagents have been combined for the run. |
|||||||||||||||||
|
||||||||||||||||||
|
| 1. After image acquisition of SignalStar Imaging Round 1, soak slides in dH2O for >30 min to gently remove coverslip. | |
|
Do not let slides dry out at any point once they are deparaffinized or have had coverslips removed. |
| 2. In the BOND RX software, create study and add slides. | |
3. When "adding slides," use the below selections for Tissue Preparation on BOND:
|
|
| 4. Select "CST SignalStar Imaging Round 2," ensuring that Slide preparation is selected as "--" and HIER is selected as "--." | |
| 5. Print labels, add labels to slides, and place slides onto the slide tray. | |
| 6. Place 2-3 drops of dH2O onto each slide before adding BOND covertiles. | |
|
IMPORTANT: Dewax and HIER (antigen retrieval) are not required for Amplification Round 2. If Dewax and HIER are used, Amplification Round 2 results will be uninterpretable. |
|
It is good practice to confirm that each step in the Imaging Round 2 protocol is correct. Please use the checklist in section 9.3 to assist in creating your protocol. |
|
Ensure that selected 0.1X TBST washes listed below are set to "Open." Fluorescent signals may be variable or diminished if washes are not "Open." Confirm that there are a total of 6 SignalStar Amplification Solution 1 steps and 6 SignalStar Amplification Solution 2 steps. |
|
Confirm the bulk Bond Wash Solution container is full, and the waste containers are empty. |
| 7. Start the BOND RX run. | |
|
Immediately start the BOND RX staining run, do not use a delayed start. Slides can sit overnight on the BOND RX autostainer once staining is complete. |
| 8. Remove slides from the BOND RX autostainer and place into 0.1X TBST. | |
| 9. Run aspirating probe cleaning run on the BOND RX autostainer. Clean covertiles as per routine procedures. | |
| 10. Prepare DAPI #4083 solution according to datasheet instructions. | |
| 11. Counterstain with DAPI solution. | |
| 12. Immerse slides in 0.1X TBST for 30 sec. | |
| 13. Mount slides with ProLong Gold Antifade Reagent #9071. | |
| 14. Image slides within 8 hr. | |
|
Do not let slides dry out at any point once they are deparaffinized or have had coverslips removed. |
| Oligo-Conjugated Antibody | Complementary Oligo | Product Pair # | Imaging Round | 488 | 594 | 647 | 750 |
(See Appendix 10.1 for an example panel design.)
| BOND Step | ✓ | Reagent | Step Type | Incubation Time (min) | Temperature (C) | Dispense Type |
| 1 | ☐ | *Deionized Water | Wash | 0:00 | Ambient | 150 µL |
| 2 | ☐ | *Deionized Water | Wash | 0:00 | Ambient | Open |
| 3 | ☐ | *Deionized Water | Wash | 0:00 | Ambient | 150 µL |
| 4 | ☐ | 0.1X TBST Solution | Wash | 0:00 | Ambient | 150 µL |
| 5 | ☐ | MARKER (SignalStar Imaging Round 1 Solution) | Primary | 40:00 | Ambient | 150 µL |
| 6 | ☐ | 1X TBST Solution | Reagent | 5:00 | Ambient | Open |
| 7 | ☐ | 0.1X TBST Solution | Reagent | 5:00 | Ambient | 150 µL |
| 8 | ☐ | 10% Neutral Buffered Formalin | Reagent | 5:00 | Ambient | 150 µL |
| 9 | ☐ | *Deionized Water | Wash | 0:00 | Ambient | Open |
| 10 | ☐ | *Deionized Water | Wash | 0:00 | Ambient | Open |
| 11 | ☐ | *Deionized Water | Wash | 0:00 | Ambient | 150 µL |
| 12 | ☐ | 0.1X TBST Solution | Reagent | 0:00 | Ambient | Open |
| 13 | ☐ | SignalStar Amplification Solution 1 | Reagent | 8:00 | Ambient | 150 µL |
| 14 | ☐ | 0.1X TBST Solution | Reagent | 0:00 | Ambient | Open |
| 15 | ☐ | 0.1X TBST Solution | Reagent | 0:00 | Ambient | Open |
| 16 | ☐ | 0.1X TBST Solution | Reagent | 0:00 | Ambient | Open |
| 17 | ☐ | SignalStar Amplification Solution 2 | Reagent | 16:00 | Ambient | 150 µL |
| 18 | ☐ | 0.1X TBST Solution | Reagent | 0:00 | Ambient | Open |
| 19 | ☐ | 0.1X TBST Solution | Reagent | 0:00 | Ambient | Open |
| 20 | ☐ | 0.1X TBST Solution | Reagent | 0:00 | Ambient | Open |
| 21 | ☐ | SignalStar Amplification Solution 1 | Reagent | 8:00 | Ambient | 150 µL |
| 22 | ☐ | 0.1X TBST Solution | Reagent | 0:00 | Ambient | Open |
| 23 | ☐ | 0.1X TBST Solution | Reagent | 0:00 | Ambient | Open |
| 24 | ☐ | 0.1X TBST Solution | Reagent | 0:00 | Ambient | Open |
| 25 | ☐ | SignalStar Amplification Solution 2 | Reagent | 16:00 | Ambient | 150 µL |
| 26 | ☐ | 0.1X TBST Solution | Reagent | 0:00 | Ambient | Open |
| 27 | ☐ | 0.1X TBST Solution | Reagent | 0:00 | Ambient | Open |
| 28 | ☐ | 0.1X TBST Solution | Reagent | 0:00 | Ambient | Open |
| 29 | ☐ | SignalStar Amplification Solution 1 | Reagent | 8:00 | Ambient | 150 µL |
| 30 | ☐ | 0.1X TBST Solution | Reagent | 0:00 | Ambient | Open |
| 31 | ☐ | 0.1X TBST Solution | Reagent | 0:00 | Ambient | Open |
| 32 | ☐ | 0.1X TBST Solution | Reagent | 0:00 | Ambient | Open |
| 33 | ☐ | SignalStar Amplification Solution 2 | Reagent | 16:00 | Ambient | 150 µL |
| 34 | ☐ | 0.1X TBST Solution | Reagent | 0:00 | Ambient | Open |
| 35 | ☐ | 0.1X TBST Solution | Reagent | 0:00 | Ambient | Open |
| 36 | ☐ | 0.1X TBST Solution | Reagent | 0:00 | Ambient | Open |
| 37 | ☐ | SignalStar Amplification Solution 1 | Reagent | 8:00 | Ambient | 150 µL |
| 38 | ☐ | 0.1X TBST Solution | Reagent | 0:00 | Ambient | Open |
| 39 | ☐ | 0.1X TBST Solution | Reagent | 0:00 | Ambient | Open |
| 40 | ☐ | 0.1X TBST Solution | Reagent | 0:00 | Ambient | Open |
| 41 | ☐ | SignalStar Amplification Solution 2 | Reagent | 16:00 | Ambient | 150 µL |
| 42 | ☐ | 0.1X TBST Solution | Reagent | 0:00 | Ambient | Open |
| 43 | ☐ | 0.1X TBST Solution | Reagent | 0:00 | Ambient | Open |
| 44 | ☐ | 0.1X TBST Solution | Reagent | 0:00 | Ambient | Open |
| 45 | ☐ | SignalStar Amplification Solution 1 | Reagent | 8:00 | Ambient | 150 µL |
| 46 | ☐ | 0.1X TBST Solution | Reagent | 0:00 | Ambient | Open |
| 47 | ☐ | 0.1X TBST Solution | Reagent | 0:00 | Ambient | Open |
| 48 | ☐ | 0.1X TBST Solution | Reagent | 0:00 | Ambient | Open |
| 49 | ☐ | SignalStar Amplification Solution 2 | Reagent | 16:00 | Ambient | 150 µL |
| 50 | ☐ | 0.1X TBST Solution | Reagent | 0:00 | Ambient | Open |
| 51 | ☐ | 0.1X TBST Solution | Reagent | 0:00 | Ambient | Open |
| 52 | ☐ | 0.1X TBST Solution | Reagent | 0:00 | Ambient | Open |
| 53 | ☐ | SignalStar Amplification Solution 1 | Reagent | 8:00 | Ambient | 150 µL |
| 54 | ☐ | 0.1X TBST Solution | Reagent | 0:00 | Ambient | Open |
| 55 | ☐ | 0.1X TBST Solution | Reagent | 0:00 | Ambient | Open |
| 56 | ☐ | 0.1X TBST Solution | Reagent | 0:00 | Ambient | Open |
| 57 | ☐ | SignalStar Amplification Solution 2 | Reagent | 16:00 | Ambient | 150 µL |
| 58 | ☐ | 0.1X TBST Solution | Reagent | 0:00 | Ambient | Open |
| 59 | ☐ | 0.1X TBST Solution | Reagent | 0:00 | Ambient | Open |
| 60 | ☐ | 0.1X TBST Solution | Reagent | 0:00 | Ambient | Open |
| 61 | ☐ | SignalStar Ligation Solution | Reagent | 20:00 | Ambient | 150 µL |
| 62 | ☐ | 0.1X TBST Solution | Reagent | 0:00 | Ambient | Open |
| 63 | ☐ | 0.1X TBST Solution | Reagent | 0:00 | Ambient | Open |
| 64 | ☐ | 0.1X TBST Solution | Reagent | 0:00 | Ambient | Open |
| 65 | ☐ | 0.1X TBST Solution | Reagent | 0:00 | Ambient | Open |
| 66 | ☐ | BOND Wash Solution | Wash | 0:00 | Ambient | 150 µL |
| BOND Step | ✓ | Reagent | Step Type | Incubation Time (min) | Temperature (C) | Dispense Type |
| 1 | ☐ | 0.1X TBST Solution | Wash | 0:00 | Ambient | Open |
| 2 | ☐ | 0.1X TBST Solution | Wash | 0:00 | Ambient | Open |
| 3 | ☐ | SignalStar Stripping Buffer | Reagent | 60:00 | 37° | 150 µL |
| 4 | ☐ | SignalStar Stripping Buffer | Reagent | 60:00 | 37° | 150 µL |
| 5 | ☐ | *Deionized Water | Wash | 0:00 | Ambient | Open |
| 6 | ☐ | *Deionized Water | Wash | 0:00 | Ambient | Open |
| 7 | ☐ | *Deionized Water | Wash | 0:00 | Ambient | Open |
| 8 | ☐ | MARKER (SignalStar Imaging Round 2 Solution) | Primary | 40:00 | Ambient | 150 µL |
| 9 | ☐ | 1X TBST Solution | Reagent | 5:00 | Ambient | Open |
| 10 | ☐ | 0.1X TBST Solution | Reagent | 5:00 | Ambient | Open |
| 11 | ☐ | 0.1X TBST Solution | Reagent | 0:00 | Ambient | Open |
| 12 | ☐ | SignalStar Amplification Solution 1 | Reagent | 8:00 | Ambient | 150 µL |
| 13 | ☐ | 0.1X TBST Solution | Reagent | 0:00 | Ambient | Open |
| 14 | ☐ | 0.1X TBST Solution | Reagent | 0:00 | Ambient | Open |
| 15 | ☐ | 0.1X TBST Solution | Reagent | 0:00 | Ambient | Open |
| 16 | ☐ | SignalStar Amplification Solution 2 | Reagent | 16:00 | Ambient | 150 µL |
| 17 | ☐ | 0.1X TBST Solution | Reagent | 0:00 | Ambient | Open |
| 18 | ☐ | 0.1X TBST Solution | Reagent | 0:00 | Ambient | Open |
| 19 | ☐ | 0.1X TBST Solution | Reagent | 0:00 | Ambient | Open |
| 20 | ☐ | SignalStar Amplification Solution 1 | Reagent | 8:00 | Ambient | 150 µL |
| 21 | ☐ | 0.1X TBST Solution | Reagent | 0:00 | Ambient | Open |
| 22 | ☐ | 0.1X TBST Solution | Reagent | 0:00 | Ambient | Open |
| 23 | ☐ | 0.1X TBST Solution | Reagent | 0:00 | Ambient | Open |
| 24 | ☐ | SignalStar Amplification Solution 2 | Reagent | 16:00 | Ambient | 150 µL |
| 25 | ☐ | 0.1X TBST Solution | Reagent | 0:00 | Ambient | Open |
| 26 | ☐ | 0.1X TBST Solution | Reagent | 0:00 | Ambient | Open |
| 27 | ☐ | 0.1X TBST Solution | Reagent | 0:00 | Ambient | Open |
| 28 | ☐ | SignalStar Amplification Solution 1 | Reagent | 8:00 | Ambient | 150 µL |
| 29 | ☐ | 0.1X TBST Solution | Reagent | 0:00 | Ambient | Open |
| 30 | ☐ | 0.1X TBST Solution | Reagent | 0:00 | Ambient | Open |
| 31 | ☐ | 0.1X TBST Solution | Reagent | 0:00 | Ambient | Open |
| 32 | ☐ | SignalStar Amplification Solution 2 | Reagent | 16:00 | Ambient | 150 µL |
| 33 | ☐ | 0.1X TBST Solution | Reagent | 0:00 | Ambient | Open |
| 34 | ☐ | 0.1X TBST Solution | Reagent | 0:00 | Ambient | Open |
| 35 | ☐ | 0.1X TBST Solution | Reagent | 0:00 | Ambient | Open |
| 36 | ☐ | SignalStar Amplification Solution 1 | Reagent | 8:00 | Ambient | 150 µL |
| 37 | ☐ | 0.1X TBST Solution | Reagent | 0:00 | Ambient | Open |
| 38 | ☐ | 0.1X TBST Solution | Reagent | 0:00 | Ambient | Open |
| 39 | ☐ | 0.1X TBST Solution | Reagent | 0:00 | Ambient | Open |
| 40 | ☐ | SignalStar Amplification Solution 2 | Reagent | 16:00 | Ambient | 150 µL |
| 41 | ☐ | 0.1X TBST Solution | Reagent | 0:00 | Ambient | Open |
| 42 | ☐ | 0.1X TBST Solution | Reagent | 0:00 | Ambient | Open |
| 43 | ☐ | 0.1X TBST Solution | Reagent | 0:00 | Ambient | Open |
| 44 | ☐ | SignalStar Amplification Solution 1 | Reagent | 8:00 | Ambient | 150 µL |
| 45 | ☐ | 0.1X TBST Solution | Reagent | 0:00 | Ambient | Open |
| 46 | ☐ | 0.1X TBST Solution | Reagent | 0:00 | Ambient | Open |
| 47 | ☐ | 0.1X TBST Solution | Reagent | 0:00 | Ambient | Open |
| 48 | ☐ | SignalStar Amplification Solution 2 | Reagent | 16:00 | Ambient | 150 µL |
| 49 | ☐ | 0.1X TBST Solution | Reagent | 0:00 | Ambient | Open |
| 50 | ☐ | 0.1X TBST Solution | Reagent | 0:00 | Ambient | Open |
| 51 | ☐ | 0.1X TBST Solution | Reagent | 0:00 | Ambient | Open |
| 52 | ☐ | SignalStar Amplification Solution 1 | Reagent | 8:00 | Ambient | 150 µL |
| 53 | ☐ | 0.1X TBST Solution | Reagent | 0:00 | Ambient | Open |
| 54 | ☐ | 0.1X TBST Solution | Reagent | 0:00 | Ambient | Open |
| 55 | ☐ | 0.1X TBST Solution | Reagent | 0:00 | Ambient | Open |
| 56 | ☐ | SignalStar Amplification Solution 2 | Reagent | 16:00 | Ambient | 150 µL |
| 57 | ☐ | 0.1X TBST Solution | Reagent | 0:00 | Ambient | Open |
| 58 | ☐ | 0.1X TBST Solution | Reagent | 0:00 | Ambient | Open |
| 59 | ☐ | 0.1X TBST Solution | Reagent | 0:00 | Ambient | Open |
| 60 | ☐ | SignalStar Ligation Solution | Reagent | 20:00 | Ambient | 150 µL |
| 61 | ☐ | 0.1X TBST Solution | Reagent | 0:00 | Ambient | Open |
| 62 | ☐ | 0.1X TBST Solution | Reagent | 0:00 | Ambient | Open |
| 63 | BOND Wash Solution | Wash | 0:00 | Ambient | 150 µL |
| Oligo-Conjugated Antibody | Complementary Oligo | Product Pair # | Imaging Round | 488 | 594 | 647 | 750 |
| PD-1 (Intracellular Domain) (D4W2J) XP® Rabbit mAb (SignalStar™ Conjugate 0008) |
Complementary Oligo (CO-0008-488) |
17942 | 1 | ● | |||
| PD-L1 (E1L3N®) XP® Rabbit mAb (SignalStar™ Conjugate 0005) |
Complementary Oligo (CO-0005-594) |
28249 | 1 | ● | |||
| TIM-3 (D5D5R™) XP® Rabbit mAb (SignalStar™ Conjugate 0010) |
Complementary Oligo (CO-0010-647) |
15231 | 1 | ● | |||
| Ki-67 (8D5) Mouse mAb (SignalStar™ Conjugate 0014) |
Complementary Oligo (CO-0014-750) |
56398 | 1 | ● | |||
| CD8ɑ (D8A8Y) Rabbit mAb (SignalStar™ Conjugate 0004) |
Complementary Oligo (CO-0004-488) |
45747 | 2 | ● | |||
| CD68 (D4B9C) XP® Rabbit mAb (SignalStar™ Conjugate 0007) |
Complementary Oligo (CO-0007-594) |
77318 | 2 | ● | |||
| CD20 (E7B7T) XP® Rabbit mAb (SignalStar™ Conjugate 0011) |
Complementary Oligo (CO-0011-647) |
36775 | 2 | ● | |||
| Pan-Keratin (C11) Mouse mAb (SignalStar™ Conjugate 0003) |
Complementary Oligo (CO-0003-750) |
97227 | 2 | ● |
How are the SignalStar Multiplex IHC Kits & Reagents validated?
CST thoroughly validates each antibody available in the SignalStar Multiplex IHC Panel Builder menu. Various combinations of antibodies are tested through titration and fluorophore pairing, and in both rounds of imaging. Testing is performed on a variety of tumors and tissue types. We also rigorously test the parent antibodies used in the traditional chromogenic assay, as they serve as the foundation of this fluorescent assay.
Does this assay work on frozen tissue?
SignalStar Multiplex IHC Kits & Reagents haven't yet been validated for use in frozen tissues. We're in the process of validating our antibodies and protocols for use in fresh or frozen tissue.
Do you have anti-mouse antibodies available?
SignalStar Multiplex IHC Kits & Reagents haven't yet been validated for use in mouse tissues. We're in the process of validating mouse-reactive antibodies.
I don't see my target of interest in your menu of available antibodies. Can I still use it in my panel in some way?
SignalStar Multiplex IHC Kits & Reagents haven't yet been validated for use with antibodies outside of our menu. We're in the process of developing custom solutions for using your own antibodies in the SignalStar Multiplex IHC assay.
Can I combine antibodies used in this assay with direct conjugates?
SignalStar Multiplex IHC Kits & Reagents haven't been validated for use in combination with direct conjugates. It's likely possible to incorporate direct conjugates into your protocol. However, because the SignalStar reagents benefit from fluorescent signal amplification, there may be spectral bleed-through that results from using the assay with conjugates that are not amplified.
When comparing my SignalStar staining to the chromogenic staining on serial sections, I see more positive cells. How do I know if this excess staining is correct?
During the course of optimization, we've found that fluorescent staining may show higher %-positivity than chromogenic staining. To ensure any excess staining is specific, confirm that the correct subcellular localization and co-localization with other stains are demonstrated. For example, if all CD8+ cells are CD3+, any excess CD8+ staining compared to the chromogenic is most likely correct.
How long after the completion of staining can I wait to image my slides?
For Imaging Round 1, the staining should show robust signal when imaged up to 8 hr post completion of staining. For Imaging Round 2, imaging should be performed as close to the completion of staining as possible, but should remain robust for up to 8 hr.
Do I need to optimize the SignalStar Multiplex IHC Kits & Reagents for the type of tissue I'm using?
The SignalStar Multiplex IHC Kits & Reagents have been optimized with respect to fluorophore pairing and order of antibodies. As tissues vary in quality and expression level of targets, increasing the concentration of antibodies in your panel by 2-fold or decreasing by 0.5 fold can help achieve optimal signal in your experiments.
What is an appropriate positive control to include in this assay? Are multiple controls necessary?
Any tissue shown to be positive for each target via chromogenic IHC can serve as a positive control tissue. Each target will therefore require a positive control, which may sometimes necessitate multiple controls. For optimal comparison, the sections should be as close to serial as possible.
For Research Use Only. Not for Use in Diagnostic Procedures.
Cell Signaling Technology, XP, and SignalStar are trademarks of Cell Signaling Technology, Inc.
E1L3N is a registered trademark of Cell Signaling Technology, Inc. Cy and CyDye are registered trademarks of GE Healthcare. All other trademarks are the property of their respective owners. Visit our Trademark Information page.
© 2023 Cell Signaling Technology, Inc. All Rights Reserved.
posted July 2023
Protocol Id: 2966
|
Storage: Store all kit components at -20°C. Stability: All components in this kit are stable for at least 12 months when stored at the recommended temperature. Do not exceed 5 freeze/thaw cycles. Application: The SignalStar kits are intended for fluorescent multiplex immunohistochemistry. Slide Number: This kit contains sufficient materials for the staining of 10 slides. |
SignalStar™ Multiplex Immunohistochemistry (mIHC) is a technology that employs antibodies, oligonucleotides (oligos), and fluorophores to interrogate cellular presence, location, function, and biomarker co-expression patterns. SignalStar technology enables the detection of multiple phenotypic and functional targets while maintaining spatial context and tissue architecture. These insights are essential for understanding how cells organize and interact to influence the tissue microenvironment and drive disease progression and response to therapy.
The power of the SignalStar system lies in the design of the SignalStar antibodies. These antibodies have been rigorously validated for use in formalin-fixed, paraffin-embedded (FFPE) tissues, and subsequently conjugated to unique oligo tags using site-specific conjugation and thorough purification methodologies. Using a highly specific network of complementary oligos and fluorophores, scientists can amplify the signal for 3-8 targets, even if they are in low abundance.
Figure 1. All antibodies in your plex size of choice (3-8 maximum unique oligo-conjugated antibodies) are added in cocktail in one primary incubation step. Complementary oligos with fluorescent dyes (channels: 488, 594, 647, and 750) amplify the signal of up to 4 oligo-conjugated antibodies in the first round of imaging by building oligo-fluorophore constructs attached to the antibody. If the plex size is greater than 4, the first round of oligos and fluorophores are gently removed, and a second round of amplification is performed to visualize up to 4 additional oligo-conjugated antibodies; the complementary oligo system and the use of the fluorophore removal process enables a second round of antibodies to be amplified from the same substrate, without cross-reactivity. The 2 images are then aligned and fused computationally with either proprietary or open-source software to generate an image consisting of up to 8 targets.
| Materials Included in Kit |
| Up to 8 SignalStar oligo-conjugated antibodies (see below) |
| Up to 8 SignalStar complementary oligos (see below) |
| SignalStar™ Antibody Diluent A |
| SignalStar™ Antibody Diluent B |
| SignalStar™ Amplification Buffer A |
| SignalStar™ Amplification Buffer B |
| SignalStar™ Amplification Oligo Set A: |
| 488 |
| 594 |
| 647 |
| 750 |
| SignalStar™ Amplification Oligo Set B: |
| 488 |
| 594 |
| 647 |
| 750 |
| SignalStar™ Ligation Buffer |
| T4 DNA Ligase (5 U/µL) |
| ATP (100 mM) |
| 10X dsDNase Buffer |
| dsDNase |
Included are up to 8 SignalStar oligo-conjugated antibodies (A) and up to 8 SignalStar complementary oligos (B) selected at the time of order and provided in sleeves with their respective oligo-antibody pair (C). See example below.
|
DO NOT COMBINE COMPLEMENTARY OLIGOS OF THE SAME FLUORESCENT CHANNEL. Imaging rounds can contain only 1 complementary oligo for each fluorescent channel. DO NOT COMBINE COMPLEMENTARY OLIGOS SPECIFIC TO THE SAME FLUORESCENT CHANNEL IN THE SAME IMAGING ROUND, AS IT WILL RENDER THE ASSAY RESULTS UNINTERPRETABLE. |
|||||||||||||||||||||||||
|
||||||||||||||||||||||||||
|
DO NOT COMBINE ANTIBODIES FROM DIFFERENT PANELS. If you are running multiple panels simultaneously, a separate antibody/complementary oligo mix must be generated for each unique panel. |
|||||||||||||||||||||||||
|
Please confirm whether your SignalStar panel design requires 2 rounds of imaging. Utilize the SignalStar Panel Design and SignalStar Panel Design Worksheet in section 9.1 and 8.1 of this document for guidance and assistance. |
|||||||||||||||||||||||||
|
Confirm your microscope can detect the fluorophores provided in this kit. When imaging, there are 4 fluorescent channels in addition to DAPI that need to be acquired. |
|||||||||||||||||||||||||
|
||||||||||||||||||||||||||
|
It is recommended that a spectral library be created by imaging single stained slides for the spectra described above. This will enable better unmixing to help minimize the possibility of spectral bleed-through. |
|||||||||||||||||||||||||
|
Usage of a DAPI concentrate is recommended rather than a mount that contains DAPI. Bright DAPI staining facilitates better image alignment. |
|||||||||||||||||||||||||
|
Fluorescent signal may be variable or diminished if solutions are not sufficiently mixed. Combine SignalStar kit components using low retention pipette tips and rotate end-over-end for 20 min at room temperature. Pipette slowly to ensure accuracy. Store all SignalStar kit components on ice when not in use. Once combined, SignalStar solutions should be kept at room temperature and used promptly. |
|||||||||||||||||||||||||
|
Optimally, slides should be imaged within 8 hr of staining completion. Fluorescent signal may be diminished if slides are not imaged within this timeframe. |
|||||||||||||||||||||||||
|
Results are not guaranteed if there is any deviation from this protocol. The SignalStar protocol was developed and optimized with the designated antigen retrieval and staining steps. |
|||||||||||||||||||||||||
|
The usage of a positive control slide is recommended. A tissue upon which chromogenic staining has confirmed the presence of all targets in the multiplex panel should be included in each run. |
|||||||||||||||||||||||||
|
It is recommended that each antibody be used at 1:100. However, enough antibody reagent is supplied for usage at either 1:50 or 1:200 dilutions. |
|||||||||||||||||||||||||
|
Drain off the incubation solutions and dH2O as much as possible throughout the staining process without allowing slides to dry out. Thoroughly flick liquid off from every slide after each step before continuing to the next. |
|
Once prepared, the SignalStar Imaging Round 1 Solution should contain ALL antibodies (up to 8) ordered with your kit (including those for Imaging Round 1 and Imaging Round 2) and the complementary oligos for Imaging Round 1. Utilize the Example SignalStar Panel Design and SignalStar Panel Design Worksheet in section 9.1 and 8.1 of this document for guidance and assistance. |
||||||||||||||||||||||||||||||||||||||||||||||||||
|
DO NOT COMBINE COMPLEMENTARY OLIGOS OF THE SAME FLUORESCENT CHANNEL. |
||||||||||||||||||||||||||||||||||||||||||||||||||
|
Prepare solutions using low retention pipette tips and rotate end-over-end for 20 min at room temperature. Pipette slowly to ensure accuracy. Store all SignalStar kit components on ice when preparing solutions. Once combined, SignalStar solutions should be kept at room temperature and used promptly. |
||||||||||||||||||||||||||||||||||||||||||||||||||
|
|||||||||||||||||||||||||||||||||||||||||||||||||||
|
Prepare solutions using low retention pipette tips and rotate end-over-end for 20 min at room temperature. Pipette slowly to ensure accuracy. Store all SignalStar kit components on ice when preparing solutions. Once combined, SignalStar solutions should be kept at room temperature and used promptly. |
||||||||||||||||||||||||||
|
|||||||||||||||||||||||||||
|
Prepare solutions using low retention pipette tips and rotate end-over-end for 20 min at room temperature. Pipette slowly to ensure accuracy. Store all SignalStar kit components on ice when preparing solutions. Once combined, SignalStar solutions should be kept at room temperature and used promptly. |
||||||||||||||||||||
|
|||||||||||||||||||||
|
Slide baking can be performed the day before you begin your experiment. This step allows for the paraffin wax to melt. |
|
1. Incubate slides for 30 min at 60°C. |
|
Do not let slides dry out at any point once they are deparaffinized. Use a humidified chamber for all incubation steps. Make sure each solution covers the entirety of the tissue. |
|
2. Incubate sections in 3 washes of xylene for 5 min each. |
|
|
3. Incubate sections in 2 washes of 100% ethanol for 10 min each. |
|
|
4. Incubate sections in 2 washes of 95% ethanol for 10 min each. |
|
|
5. Wash sections 2 times in dH2O for 5 min each. |
|
EDTA antigen retrieval in a pressure cooker is recommended to maximize retrieval of epitopes. This protocol describes the conditions that are recommended for the Biocare Medical Decloaking Chamber #DC2012. Device-specific settings and operating instructions should be utilized for other pressure cookers. |
||
|
|||
|
7. Place 500 mL dH2O into the pressure cooker. |
|||
|
8. Place the slide holder into the pressure cooker, touching the heat shield. Partially cover with a slide container lid. |
|||
|
It may be advantageous to place a second 24-slide holder filled with 250 mL water and blank slides into the pressure cooker, and partially cover with a lid. |
||
|
9. Seal the chamber and proceed with retrieval. Settings for the Biocare Medical Decloaking Chamber #DC2012 are as follows:
|
|||
|
10. Carefully vent the device, then remove the lid. |
|||
|
11. Remove slides from the decloaking chamber and allow to cool on the bench top for 10 min. |
|||
|
|
13. Incubate slides in 150 µL of SignalStar Imaging Round 1 Solution for 40 min at room temperature. |
|
|
Slides can alternatively be incubated in SignalStar Imaging Round 1 Solution overnight at 4°C in order to break up the protocol into multiple days. |
|
14. Thoroughly flick off liquid from slides and immerse in 1X TBST for 30 sec. |
|
|
15. Incubate slides in 10% Neutral Buffered Formalin for 5 min at room temperature. |
|
|
16. Thoroughly flick off liquid from slides and immerse in dH2O for 30 sec. |
|
|
18. Incubate slides in 150 µL of SignalStar Ligation Buffer for 20 min at room temperature. |
|
|
19. Thoroughly flick off liquid from slides and immerse in dH2O for 30 sec. |
|
20. Prepare DAPI #4083 solution according to datasheet instructions. |
|
|
21. Immerse slides in 1X TBST for 30 sec. |
|
|
22. Counterstain with DAPI solution. |
|
|
23. Immerse slides in 1X TBST for 30 sec. |
|
|
24. Mount slides with ProLong Gold Antifade Reagent #9071. |
|
|
25. Image slides as soon as possible. Signal should remain robust for up to 8 hr. |
|
SIGNALSTAR IMAGING ROUND 2 IS ONLY NEEDED FOR ANTIBODY PANELS THAT REQUIRE TWO IMAGING ROUNDS. Utilize the Example SignalStar Panel Design and SignalStar Panel Design Worksheet in section 9.1 and 8.1 of this document for guidance and assistance. |
|
Prepare solutions using low retention pipette tips and rotate end-over-end for 20 min at room temperature. Pipette slowly to ensure accuracy. Store all SignalStar kit components on ice when preparing solutions. Once combined, SignalStar solutions should be kept at room temperature and used promptly. |
|||||||||||||||||
|
||||||||||||||||||
|
Once prepared, the SignalStar Imaging Round 2 Solution should contain only the complementary oligos for Imaging Round 2. Utilize the Example SignalStar Panel Design and SignalStar Panel Design Worksheet in section 9.1 and 8.1 of this document for guidance and assistance. |
||||||||||||||||||||||||||
|
NO ANTIBODY-OLIGO CONJUGATES ARE ADDED TO THE SIGNALSTAR IMAGING ROUND 2 SOLUTION. |
||||||||||||||||||||||||||
|
DO NOT COMBINE COMPLEMENTARY OLIGOS OF THE SAME FLUORESCENT CHANNEL. |
||||||||||||||||||||||||||
|
Prepare solutions using low retention pipette tips and rotate end-over-end for 20 min at room temperature. Pipette slowly to ensure accuracy. Store all SignalStar kit components on ice when preparing solutions. Once combined, SignalStar solutions should be kept at room temperature and used promptly. |
||||||||||||||||||||||||||
|
|||||||||||||||||||||||||||
|
Prepare solutions using low retention pipette tips and rotate end-over-end for 20 min at room temperature. Pipette slowly to ensure accuracy. Store all SignalStar kit components on ice when preparing solutions. Once combined, SignalStar solutions should be kept at room temperature and used promptly. |
||||||||||||||||||||
|
|||||||||||||||||||||
|
SIGNALSTAR IMAGING ROUND 2 IS ONLY NEEDED FOR ANTIBODY PANELS THAT REQUIRE TWO IMAGING ROUNDS. Utilize the Example SignalStar Panel Design and SignalStar Panel Design Worksheet in section 9.1 and 8.1 of this document for guidance and assistance. |
|
Once imaging is complete, fluorescent signal can be removed from slides so that another round of imaging can be performed. Perform the next set of steps as soon as possible following the first round of imaging. |
|
1. After image acquisition, soak slides in dH2O for ≥30 min to gently remove coverslips without damaging tissue. |
|
|
2. Incubate slides in 150 µL of SignalStar Fluorescent Removal Solution for 2 hr at 37°C. |
|
|
3. Immerse slides in dH2O for 30 sec. |
|
|
4. Optional: |
|
5. Incubate slides in 150 µL of SignalStar Imaging Round 2 Solution for 40 min at room temperature. |
|
|
6. Thoroughly flick off liquid from slides and immerse in dH2O for 30 sec. |
|
|
8. Incubate slides in 150 µL of SignalStar Ligation Buffer for 20 min at room temperature. |
|
|
9. Thoroughly flick off liquid from slides and immerse in dH2O for 30 sec. |
|
10. Prepare DAPI #4083 solution according to datasheet instructions. |
|
|
11. Immerse slides in 1X TBST for 30 sec. |
|
|
12. Counterstain with DAPI solution. |
|
|
13. Immerse slides in 1X TBST for 30 sec. |
|
|
14. Thoroughly flick off liquid from slides and immerse in dH2O for 30 sec. |
|
|
15. Mount slides with ProLong Gold Antifade Reagent #9071. |
|
|
16. Image slides as soon as possible. Signal should remain robust for up to 8 hr. |
| Oligo-Conjugated Antibody | Complementary Oligo | Imaging Round | 488 | 594 | 647 | 750 |
(See Appendix 9.1 for an example panel design.)
| Amplification Round | Step # | ✓ | Step |
| Amplification Round 1 | 1 | ☐ | Incubate in SignalStar™ Amplification Solution 1 for 8 min. |
| 2 | ☐ | Immerse slides in dH2O for 30 sec. | |
| 3 | ☐ | Incubate in SignalStar™ Amplification Solution 2 for 8 min. | |
| 4 | ☐ | Immerse slides in dH2O for 30 sec. | |
| Amplification Round 2 | 5 | ☐ | Incubate in SignalStar™ Amplification Solution 1 for 8 min. |
| 6 | ☐ | Immerse slides in dH2O for 30 sec. | |
| 7 | ☐ | Incubate in SignalStar™ Amplification Solution 2 for 8 min. | |
| 8 | ☐ | Immerse slides in dH2O for 30 sec. | |
| Amplification Round 3 | 9 | ☐ | Incubate in SignalStar™ Amplification Solution 1 for 8 min. |
| 10 | ☐ | Immerse slides in dH2O for 30 sec. | |
| 11 | ☐ | Incubate in SignalStar™ Amplification Solution 2 for 8 min. | |
| 12 | ☐ | Immerse slides in dH2O for 30 sec. | |
| Amplification Round 4 | 13 | ☐ | Incubate in SignalStar™ Amplification Solution 1 for 8 min. |
| 14 | ☐ | Immerse slides in dH2O for 30 sec. | |
| 15 | ☐ | Incubate in SignalStar™ Amplification Solution 2 for 8 min. | |
| 16 | ☐ | Immerse slides in dH2O for 30 sec. | |
| Amplification Round 5 | 17 | ☐ | Incubate in SignalStar™ Amplification Solution 1 for 8 min. |
| 18 | ☐ | Immerse slides in dH2O for 30 sec. | |
| 19 | ☐ | Incubate in SignalStar™ Amplification Solution 2 for 8 min. | |
| 20 | ☐ | Immerse slides in dH2O for 30 sec. | |
| Amplification Round 6 | 21 | ☐ | Incubate in SignalStar™ Amplification Solution 1 for 8 min. |
| 22 | ☐ | Immerse slides in dH2O for 30 sec. | |
| 23 | ☐ | Incubate in SignalStar™ Amplification Solution 2 for 8 min. | |
| 24 | ☐ | Immerse slides in dH2O for 30 sec. | |
| Amplification Round 7 | 25 | ☐ | Incubate in SignalStar™ Amplification Solution 1 for 8 min. |
| 26 | ☐ | Immerse slides in dH2O for 30 sec. | |
| 27 | ☐ | Incubate in SignalStar™ Amplification Solution 2 for 8 min. | |
| 28 | ☐ | Immerse slides in dH2O for 30 sec. | |
| Amplification Round 8 | 29 | ☐ | Incubate in SignalStar™ Amplification Solution 1 for 8 min. |
| 30 | ☐ | Immerse slides in dH2O for 30 sec. | |
| 31 | ☐ | Incubate in SignalStar™ Amplification Solution 2 for 8 min. | |
| 32 | ☐ | Immerse slides in dH2O for 30 sec. |
| Oligo-Conjugated Antibody | Complementary Oligo | Product Pair # | Imaging Round | 488 | 594 | 647 | 750 |
| PD-1 (Intracellular Domain) (D4W2J) XP® Rabbit mAb (SignalStar™ Conjugate 0008) | Complementary Oligo (CO-0008-488) |
17942 | 1 | ● | |||
| PD-L1 (E1L3N®) XP® Rabbit mAb (SignalStar™ Conjugate 0005) | Complementary Oligo (CO-0005-594) |
28249 | 1 | ● | |||
| TIM-3 (D5D5R™) XP® Rabbit mAb (SignalStar™ Conjugate 0010) | Complementary Oligo (CO-0010-647) |
15231 | 1 | ● | |||
| Ki-67 (8D5) Mouse mAb (SignalStar™ Conjugate 0014) | Complementary Oligo (CO-0014-750) |
56398 | 1 | ● | |||
| CD8ɑ (D8A8Y) Rabbit mAb (SignalStar™ Conjugate 0004) | Complementary Oligo (CO-0004-488) |
45747 | 2 | ● | |||
| CD68 (D4B9C) XP® Rabbit mAb (SignalStar™ Conjugate 0007) | Complementary Oligo (CO-0007-594) |
77318 | 2 | ● | |||
| CD20 (E7B7T) XP® Rabbit mAb (SignalStar™ Conjugate 0011) | Complementary Oligo (CO-0011-647) |
36775 | 2 | ● | |||
| Pan-Keratin (C11) Mouse mAb (SignalStar™ Conjugate 0003) | Complementary Oligo (CO-0003-750) |
97227 | 2 | ● |
How are the SignalStar Multiplex IHC Kits & Reagents validated?
CST thoroughly validates each antibody available in the SignalStar Multiplex IHC Panel Builder menu. Various combinations of antibodies are tested through titration and fluorophore pairing, and in both rounds of imaging. Testing is performed on a variety of tumors and tissue types. We also rigorously test the parent antibodies used in the traditional chromogenic assay, as they serve as the foundation of this fluorescent assay.
Does this assay work on frozen tissue?
SignalStar Multiplex IHC Kits & Reagents haven’t yet been validated for use in frozen tissues. We’re in the process of validating our antibodies and protocols for use in fresh or frozen tissue.
Do you have anti-mouse antibodies available?
SignalStar Multiplex IHC Kits & Reagents haven’t yet been validated for use in mouse tissues. We’re in the process of validating mouse-reactive antibodies.
I don’t see my target of interest in your menu of available antibodies. Can I still use it in my panel in some way?
SignalStar Multiplex IHC Kits & Reagents haven’t yet been validated for use with antibodies outside of our menu. We’re in the process of developing custom solutions for using your own antibodies in the SignalStar Multiplex IHC assay.
Can I combine antibodies used in this assay with direct conjugates?
SignalStar Multiplex IHC Kits & Reagents haven’t been validated for use in combination with direct conjugates. It’s likely possible to incorporate direct conjugates into your protocol. However, because the SignalStar reagents benefit from fluorescent signal amplification, there may be spectral bleed-through that results from using the assay with conjugates that are not amplified.
When comparing my SignalStar staining to the chromogenic staining on serial sections, I see more positive cells. How do I know if this excess staining is correct?
During the course of optimization, we’ve found that fluorescent staining may show higher %-positivity than chromogenic staining. To ensure any excess staining is specific, confirm that the correct subcellular localization and co-localization with other stains are demonstrated. For example, if all CD8+ cells are CD3+, any excess CD8+ staining compared to the chromogenic is most likely correct.
How long after the completion of staining can I wait to image my slides?
For Imaging Round 1, the staining should show robust signal when imaged up to 8 hr post completion of staining. For Imaging Round 2, imaging should be performed as close to the completion of staining as possible, but should remain robust for up to 8 hr.
Do I need to optimize the SignalStar Multiplex IHC Kits & Reagents for the type of tissue I’m using?
The SignalStar Multiplex IHC Kits & Reagents have been optimized with respect to fluorophore pairing and order of antibodies. As tissues vary in quality and expression level of targets, increasing the concentration of antibodies in your panel by 2-fold or decreasing by 0.5 fold can help achieve optimal signal in your experiments.
What is an appropriate positive control to include in this assay? Are multiple controls necessary?
Any tissue shown to be positive for each target via chromogenic IHC can serve as a positive control tissue. Each target will therefore require a positive control, which may sometimes necessitate multiple controls. For optimal comparison, the sections should be as close to serial as possible.
For Research Use Only. Not for Use in Diagnostic Procedures.
Cell Signaling Technology, XP, and SignalStar are trademarks of Cell Signaling Technology, Inc.
E1L3N is a registered trademark of Cell Signaling Technology, Inc. Cy and CyDye are registered trademarks of GE Healthcare. All other trademarks are the property of their respective owners. Visit our Trademark Information page.
© 2023 Cell Signaling Technology, Inc. All Rights Reserved.
posted July 2023
Protocol Id: 2965
Human
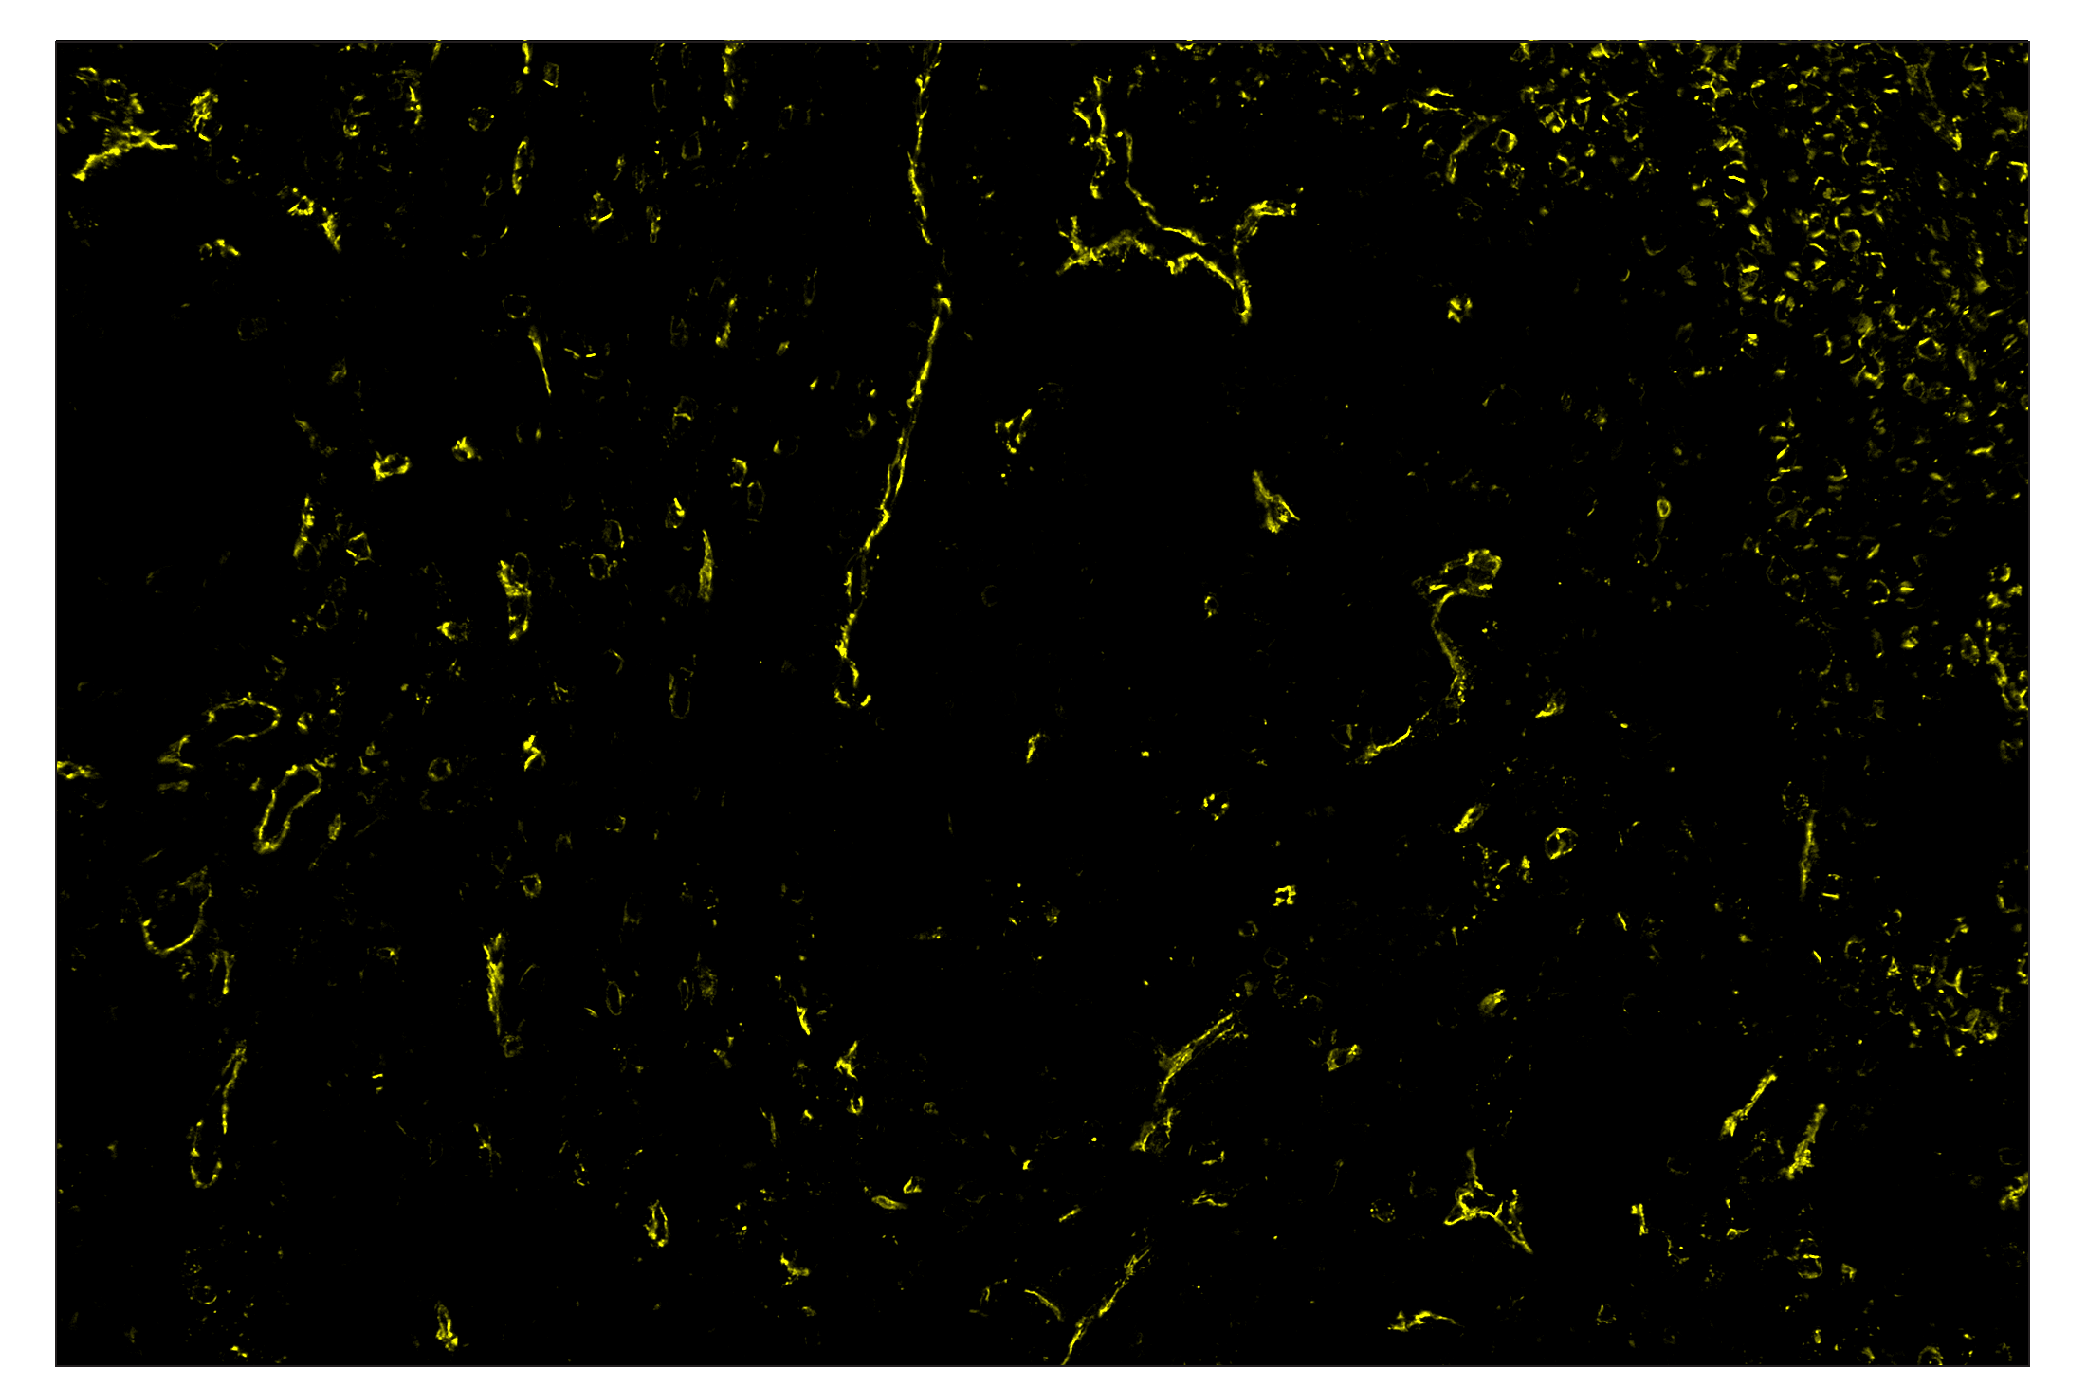
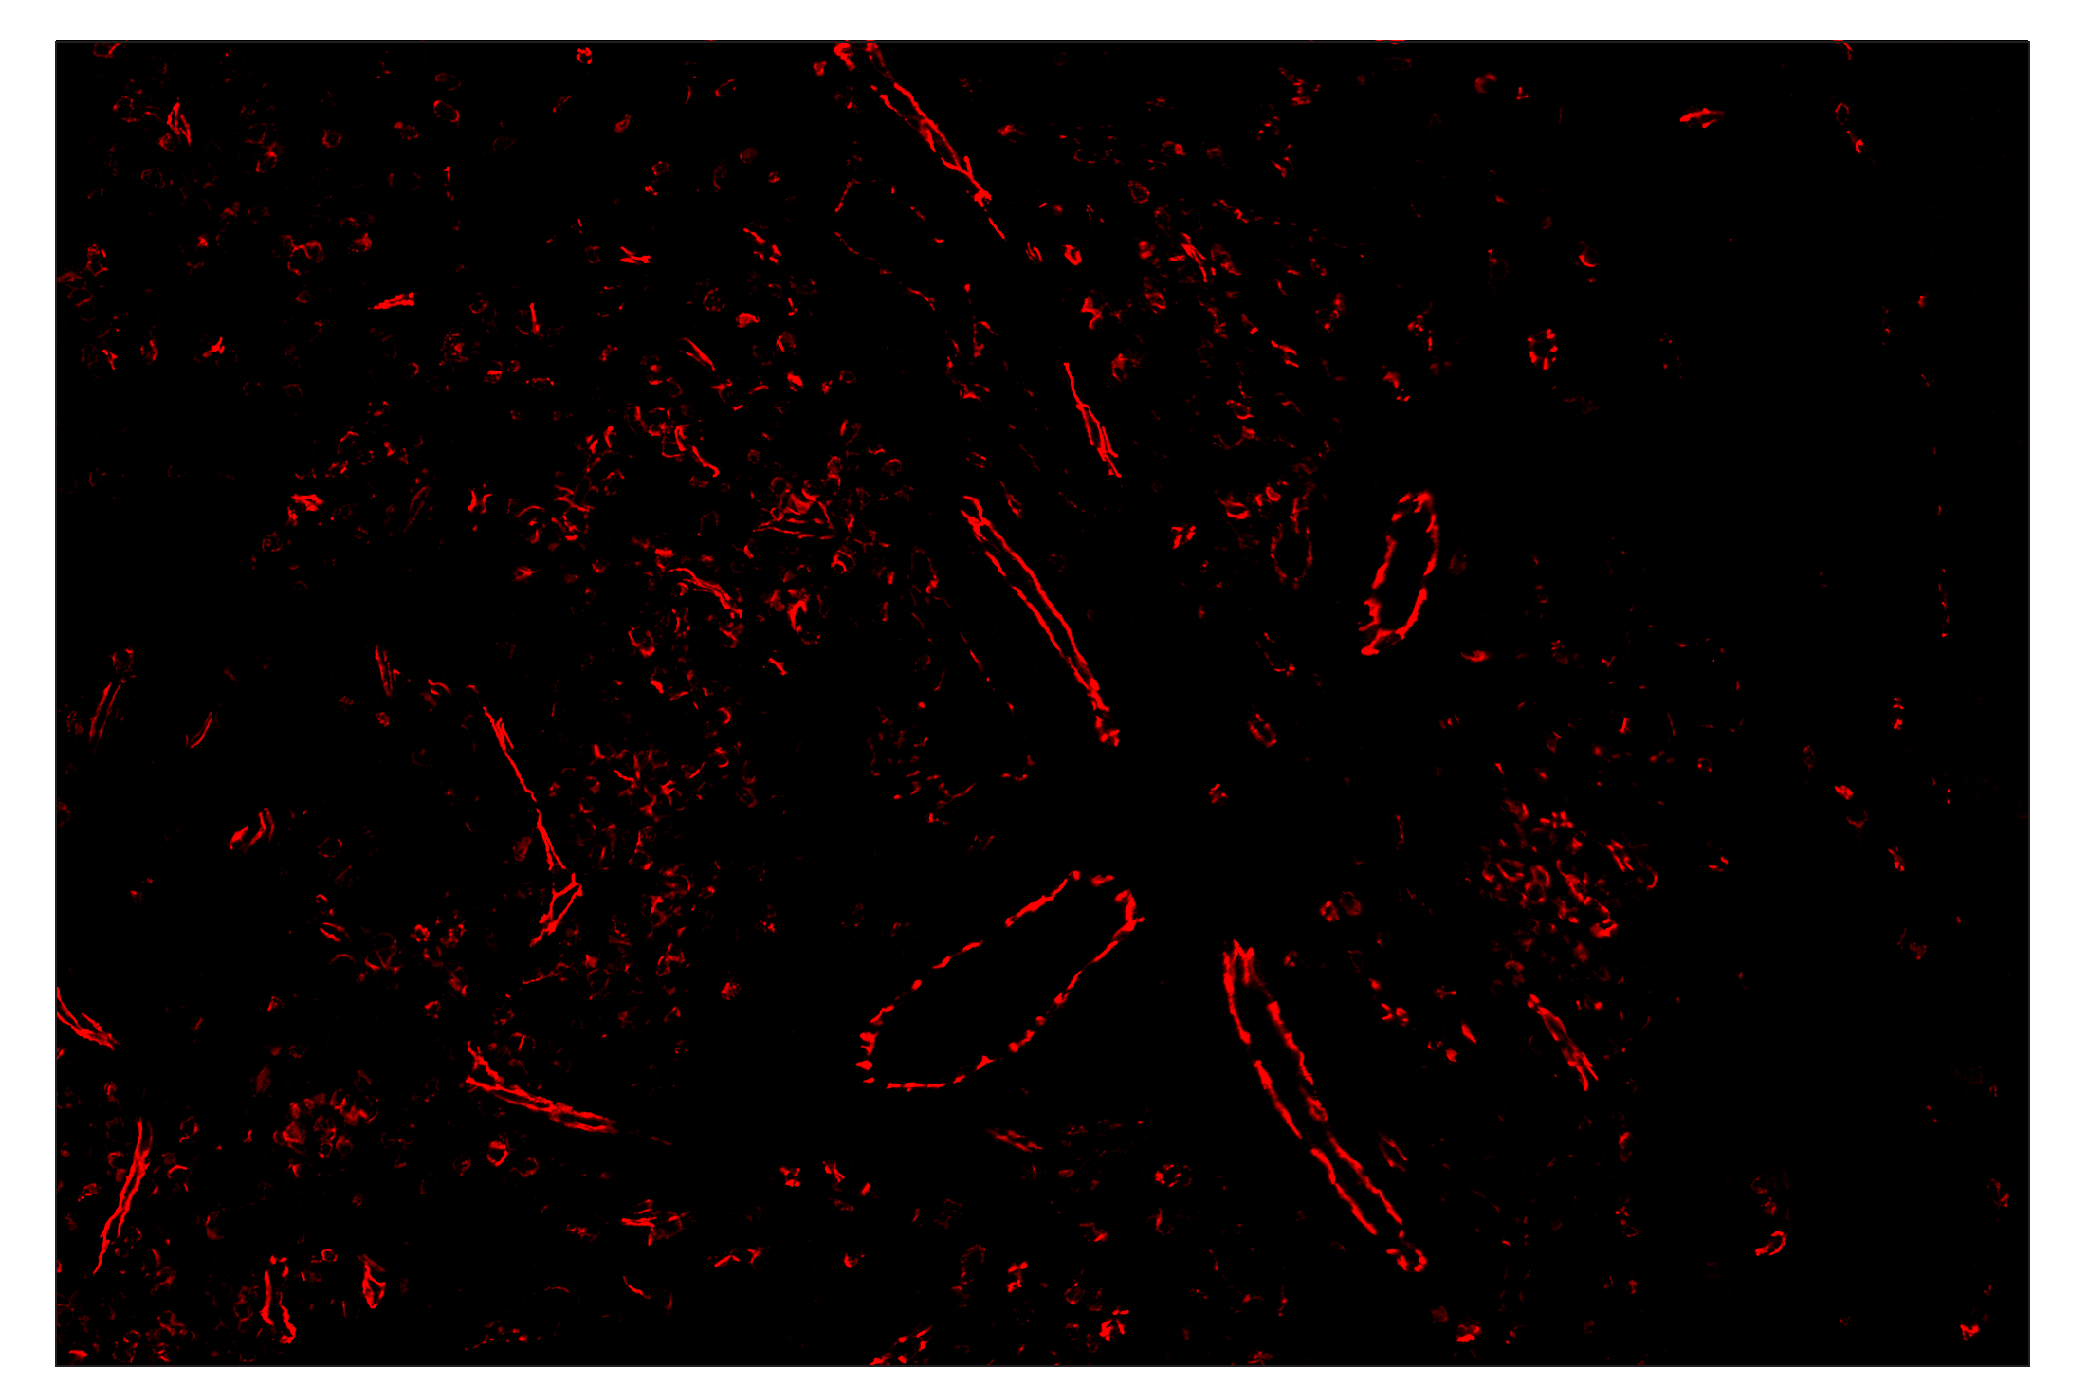
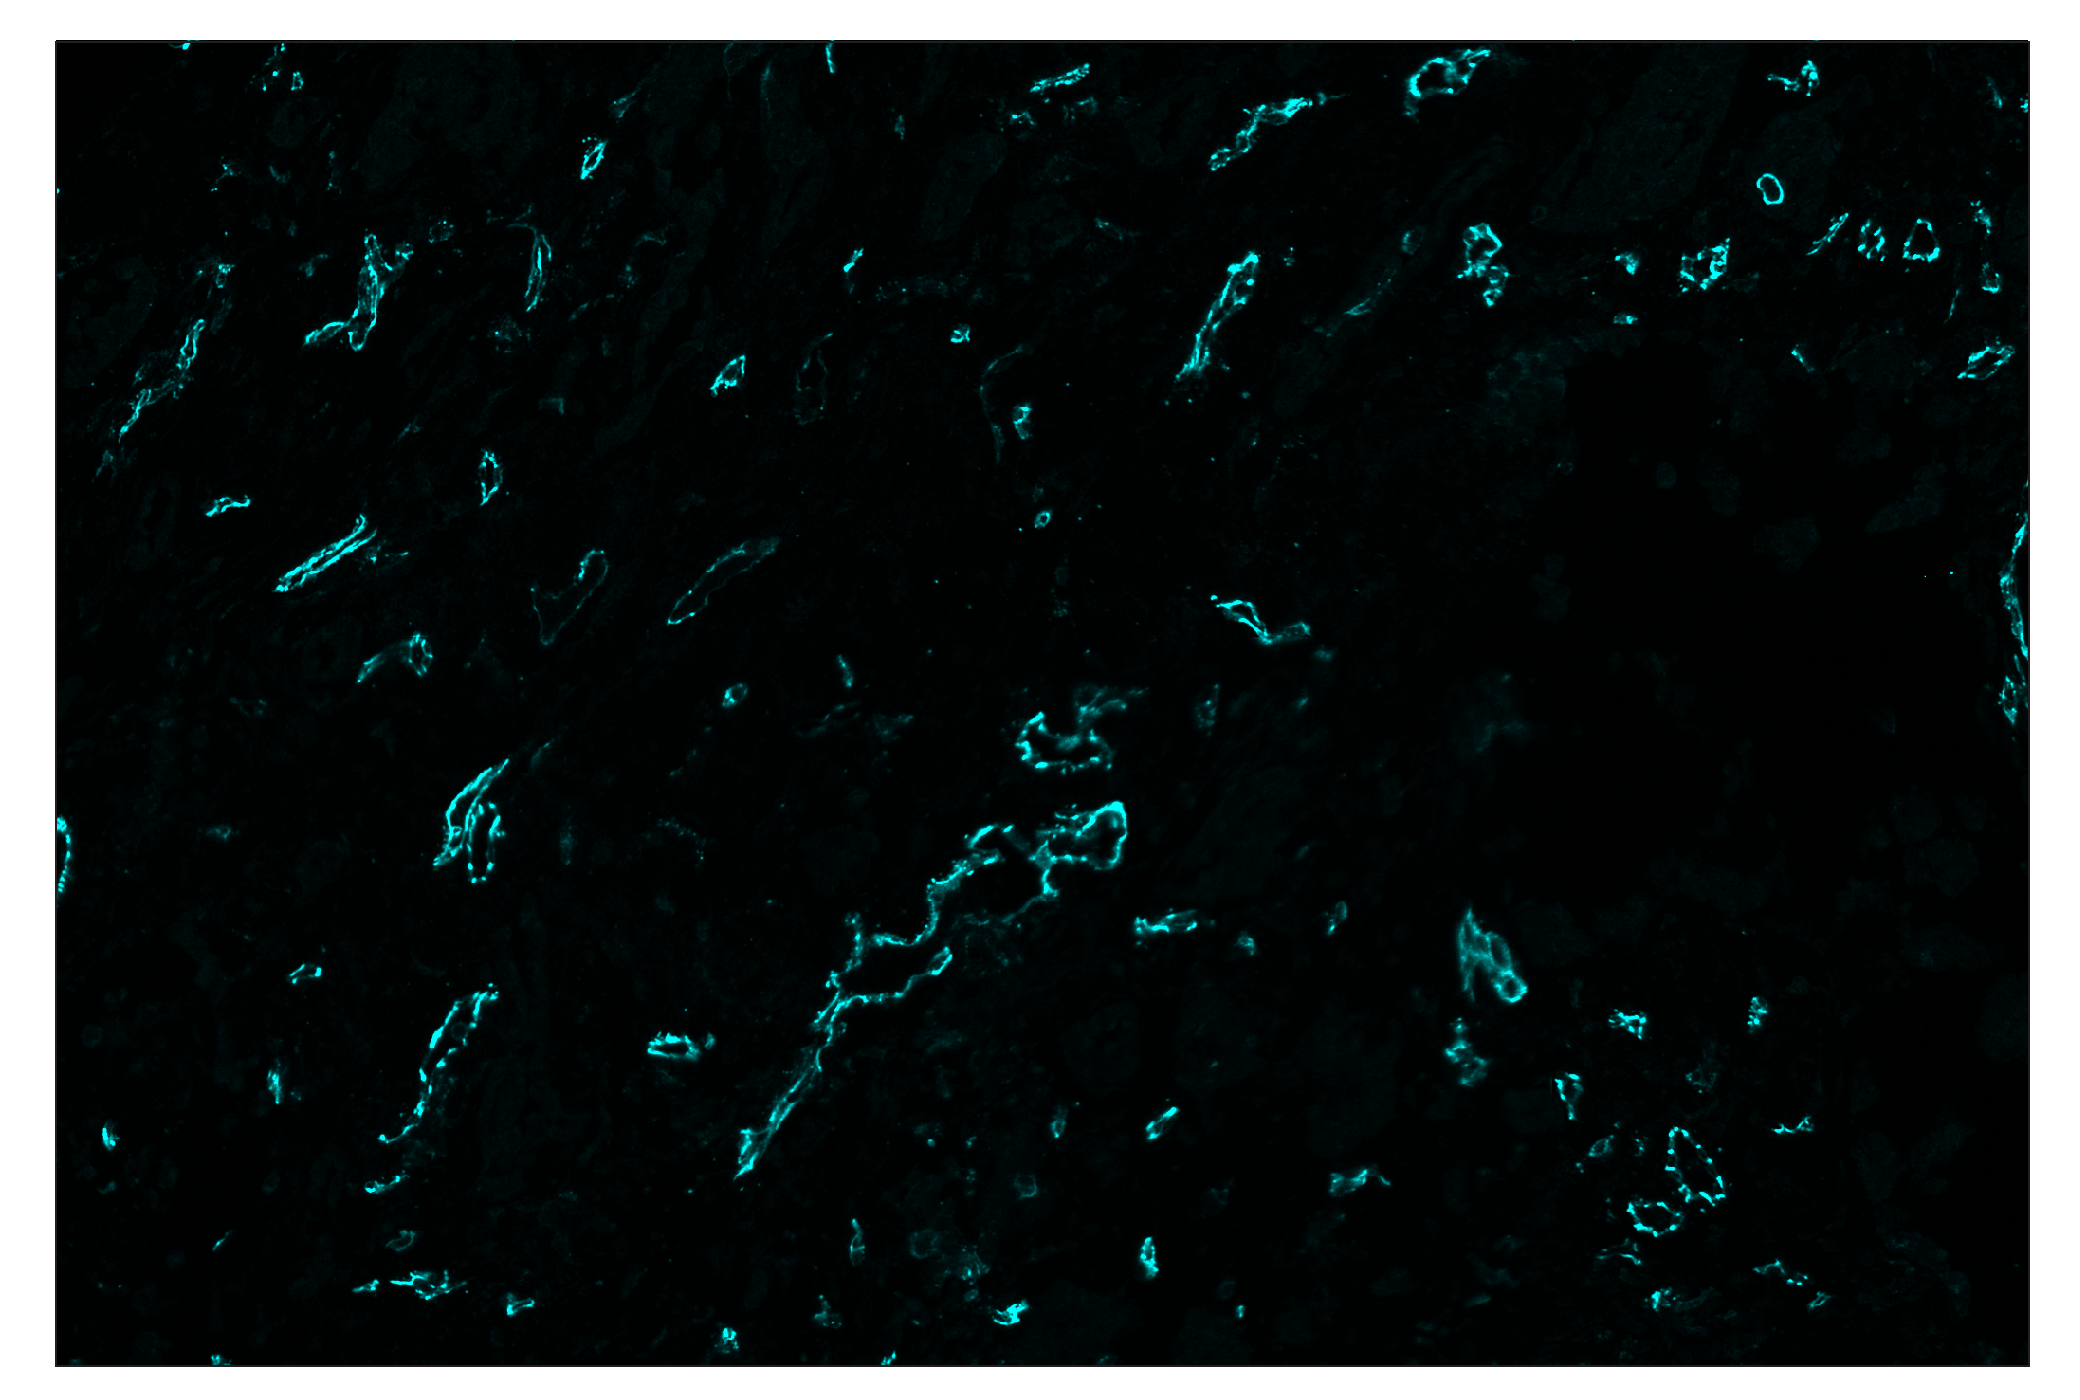
Monoclonal antibody is produced by immunizing animals with recombinant human CD31 protein.
CD31 (Platelet Endothelial Cell Adhesion Molecule-1: PECAM-1), a member of the Ig superfamily of cell adhesion molecules, is expressed by circulating platelets, monocytes, neutrophils, some T cells, and endothelial cells and modulates cell adhesion, endothelial cell migration, and angiogenesis (1). CD31 is phosphorylated on Tyr686 at the cytoplasmic carboxy-terminal tail upon various stimuli (e.g. mechanical or oxidative stress), presumably by Src family members (2). The tyrosine phosphorylation mediates associations with a number of SH2 domain-containing binding partners such as PI3 kinase, SHIP, PLCγ, and SHP-2. Thus, CD31 serves as a scaffold for various signaling molecules (3).
Except as otherwise expressly agreed in a writing signed by a legally authorized representative of CST, the following terms apply to Products provided by CST, its affiliates or its distributors. Any Customer's terms and conditions that are in addition to, or different from, those contained herein, unless separately accepted in writing by a legally authorized representative of CST, are rejected and are of no force or effect.
Products are labeled with For Research Use Only or a similar labeling statement and have not been approved, cleared, or licensed by the FDA or other regulatory foreign or domestic entity, for any purpose. Customer shall not use any Product for any diagnostic or therapeutic purpose, or otherwise in any manner that conflicts with its labeling statement. Products sold or licensed by CST are provided for Customer as the end-user and solely for research and development uses. Any use of Product for diagnostic, prophylactic or therapeutic purposes, or any purchase of Product for resale (alone or as a component) or other commercial purpose, requires a separate license from CST. Customer shall (a) not sell, license, loan, donate or otherwise transfer or make available any Product to any third party, whether alone or in combination with other materials, or use the Products to manufacture any commercial products, (b) not copy, modify, reverse engineer, decompile, disassemble or otherwise attempt to discover the underlying structure or technology of the Products, or use the Products for the purpose of developing any products or services that would compete with CST products or services, (c) not alter or remove from the Products any trademarks, trade names, logos, patent or copyright notices or markings, (d) use the Products solely in accordance with CST Product Terms of Sale and any applicable documentation, and (e) comply with any license, terms of service or similar agreement with respect to any third party products or services used by Customer in connection with the Products.